Showing posts with label planner. Show all posts

Monday, August 3, 2015

Using Travel Notebook to Plan Vacation


Hello again, this is Lucy, also known as organisedlucy on Instagram. I can’t believe it is already August and it's time for vacation. I was so excited to receive Happie Scrappie planner kit this month. Everything is so cute and would work with any planner you have, but today I am going to show you how I use the travel notebook to plan my upcoming vacation. You may be wondering “why travel notebook and not other types of inserts”? The reason is pretty simple, I like to bring my happiedori when I travel due to the fact that it is durable and lightweight. Moreover, I can slot up to 3 travel notebooks inside it (one for travel schedule, one for brain dump and one extra notebook).

When you think of vacations, you tend to start dreaming of all the fun places to visit, the unique shopping places to go, the good food to indulge and in my case, friends that I am going to meet. I am very excited to go on this vacation because the main purpose of this trip is to attend my best friend’s wedding in Jakarta. However I usually get overwhelmed with all the lists of the things I need to do and to bring along for the vacation. Moreover, if you have ever been to Jakarta, you will know that Jakarta has the worst traffic, which is why it is even more important to plan everything ahead of time. The top of my list would be to satisfy my craving for Indonesian food and shop for my favorite local products.

Without further ado, let’s have a look at this month’s inserts. I love that this month’s travel notebook is blank as it provides so much versatility for how one can use it.


First, I started stamping on Happie Scappie stickers. I used the Studio L2E stamps sets to mark “PACKING LIST”, “SHOPPING”, “RESTAURANTS”, “DON’T FORGET”, “CARRY-ON” and “TO DO” on the Happie Scrappie Stickers. I adore this month stickers. These are beyond cute with the critters’ heads and the mushroom peeking from the corner of the stickers.


After that, all I needed to do is to paste the stickers on to the pages and I added the tiny dot stickers leftover from previous month planner kit to serve as the checklist.


With the lists done, I then planned my daily travelling schedule from Friday to Sunday,as I would be flying back to Singapore on Monday morning. I used the Brush Script stamp set from StudioL2E to stamp the day on Happie Scrappie Stickers. I then filled in my daily planned schedule. And it will be all done.


I find it very useful to record everything I need to do before my vacation as I tend to forget details if I don’t do it. And the best part is, all the planner supplies that I need come from the Happiescrappie planner kit. They totally add the touch of fun and colour to your planner.


I hope you find this post useful and happie planning everyone. See you next time.

Xoxo

Lucy


Products that I have used in this post.


Happie Scrappie Inserts
Metal Binder Clips
Happie Scrappie Travel Notebook

Happie Scrappie Tear Drop Stickers


Happie Scrappie Tiny Dots Stickers


Monday, May 18, 2015

Planners | From Project Life Pockets to Planner Storage

Hello hello there! Today I am gonna share a simple post on how I use the pocket sleeves from Simple Stories in one of my A5 sized planner to store my Shop Evalicious goodies (like stickers, journaling cards and paper clips).


Sorry for the glare but this is the best photo i could get to show you a rough idea how the plastic sleeve (in 6x8 size) would look like in a Kikki K Large planner. In general, Kikki K large planner (which is equivalent to Filofax A5 size) is slightly wider, thus I did not trim down the sides of the sleeves as they just fit nicely.


And now, let's get started to turn this Project Life sleeves into planner pockets. All you need is a single hole punch and 6x8 plastic sleeve ( mine are from Simple Stories and i love love love their quality)


I just use one of the A5 size insert to determine where the holes should go. The original 2 holes on the sleeves actually match up with the 2nd and 5th holes of my 6-ring binder.


And here's how the sleeves look like in my A5 sized planner. Nothing is peeking out but when you close the binder, the sleeve might touch the elastic pen loop a little bit but it doesn't bother me at all as I don't really keep my pen there.


For this page, I actually fill up all the pockets with planner stickers. I actually use a paperclip from Shop Evalicious to hold the pocket to prevent the stickers from falling out of the pocket. I usually make my stickers in 3.75' x 5.75', so they are just perfect to be slotted into the 4x6 sized pocket.

p.s the hot air balloon and dew drop stickers can be found in my shop.


I added some journaling cards and Instax photo to the back of this pocket.


And for the sleeve, I actually store some washi tapes sampler and also paper clips. I just trim the 3x4 journalling card a little smaller than 3' and wrap washi tapes around. And for storing paper clips, I cut two slits with my trusty paper trimmer, and added the clips.


And more pics on how each sleeve looks like. This pockets are also perfect for storing memorabilia, receipts and name cards. I hope you have fun using some of your scrapbooking stash in your planners!

Have a great day ;)


Xoxo,
Sam


Evalicious products used:
    

Friday, March 13, 2015

Feature Friday #1 | Riesa Okano

Hello everyone, we have been packing kits and mails for the past 3 days and also running out and about (to meet suppliers and printers) for new products for my online shop. I normally trying not to manage so much things in a week because I tend to get tired easily nowadays, especially with terrible backache. Anyway, to spice my blog up a little, I have been wanting to do some Friday Feature post since end of last year. And you know, me being a procrastinator, it only took me 3 months to took the plunge and commit to a more frequent, weekly post. 

So I am planning to do a Friday Feature, every week (finger crossing that I would be able to be really disciplined on blogging), to feature some of my favourite planner addicts / planner girls, fave products, ways to decorate your planners, or also ways to stay organised. And for our very very first Friday Feature post, we have Riesa Okano that I got to know her when she purchased a planner via my online store. Since she has gotten the Macaron pastel pink planner from my store, I ask her if she could show me her set up and maybe contribute a blog post to my blog here. I am so thrilled that she agreed and also send me loads of pictures + ideas on how she set her pink planner up. 
_________________________________________________________________

So let's get started and get to know more about the lovely Riesa Okano.

Q: Can you tell us a little bit about yourself?
A:  I am currently a student at the the University of Hawaii at Manoa, I live in Honolulu Hawaii and I love to go shopping, decorate my planer, watch movies and go out to eat. Other things about me is I am Japanese, I love the color pink, I love macaroon things, I will buy anything cute or pink related and my favorite store is target.


Q: How many planner(s) are you using right now? And what is (are) your planner(s)?A: Right now I only have 2 planners my personal pastel pink one and my large pink kiki k planner that I do not use as often because it is so bulky, I usually just use it as a desk planner. I hope to buy a filofax or websterpages or erin condren planner one day. And I do use Kikki k inserts :) I didn’t have enough time to make inserts so I just bought from the Kikki website.


Q: Where do you find inspirations for your planner addict fix?
A: I find inspiration on instagram mostly and from blog posts. My favorite planner girls would be you of course! (Thanks so much!!!) You sell such cute things and you have wonderful blog/youtube posts. I also like to follow Charmaine Dulak, Carla De Taboada, Mypurpleylife and Mahalmade. 


And here's a cute post (with tonnes of photos) on how Riesa set her Macaron Planner in Pastel Pink up:

This planner is my go to planner that I use for almost everything; my daily to dos, work schedule, reminders, events and etc. I stuff a ton of sticky notes, page flags and a few paper clips in the front of my planner along with a little heart shaped cardstock. As for my planner charms I use my heart shaped macaroon planner charm and my Totoro Susuwatari planner charm to accent my planner. In front of my dashboard I use a little card that has all my professors office hours on top so it’s all in one place. Also I use a coleto pen in my planner because I can have one pen with that holds different colors.


So far I only have a monthly and weekly section I feel that these two sections are the only ones I need right now and if I want to add more I can always do that later. To bookmark my monthly page I use a bow paper clip and a little divider. To decorate my monthly pages I usually use washi tape, stickers and page flags.


Here's a peek into my monthly page: I usually track incoming packages, exam days, birthdays, reminders, pay day and bill dates on my monthly pages and on the side of my monthly page I have a list of all the orders I order so I can keep track of what came in already and what didn’t. After my packages come in I cross it out with pink ink. As for my weekly pages I track my daily to do’s, chores, errands, work schedule, package delivery dates and random notes about things I want to/need to buy.


As for my weekly pages I also decorate with washi tape, stickers and sticky notes. To bookmark my weekly pages I use a purple hello kitty paper clip.


And that's about it!
In the back of my planner I have this clear insert that has pockets I put stickers in.


And lastly at the very back of my planner I have a pocket, which I put some coupons, blank pieces of paper and more stickers in.
_________________________________________________________________

Thanks so much Riesa! Don't you just love her planner charms (you know I  always have a thing for planner charms!), how she matches her pink pen with the planner,  and how she decorates her pages?And now, to learn more about Riesa (she is really pretty!) and her planner addiction, go follow her on her Instagram @Riesao, and tell her that Happie Scrappie send you there!

And I am seriously very excited that we kick start the first Friday Feature post! I am hoping to do this diligently ;)  *Wish me luck*

XoXo
Sam

Sunday, February 22, 2015

Randoms | Snippets of My Life as A Work-From-Home-Mom


Hello everyone,

I have been wanting to write a blog post (a more personal post) to share a peek into my life with you. For those who have followed me on Instagram, I often share photos of my planners, stationeries, happie mails, and sometimes photos of my little helper (or my little Mascot you may call him) and also a peek into my little studio.

p.s. This is an extremely photo heavy post - with photos of my planners, studio and also little mascot. =)
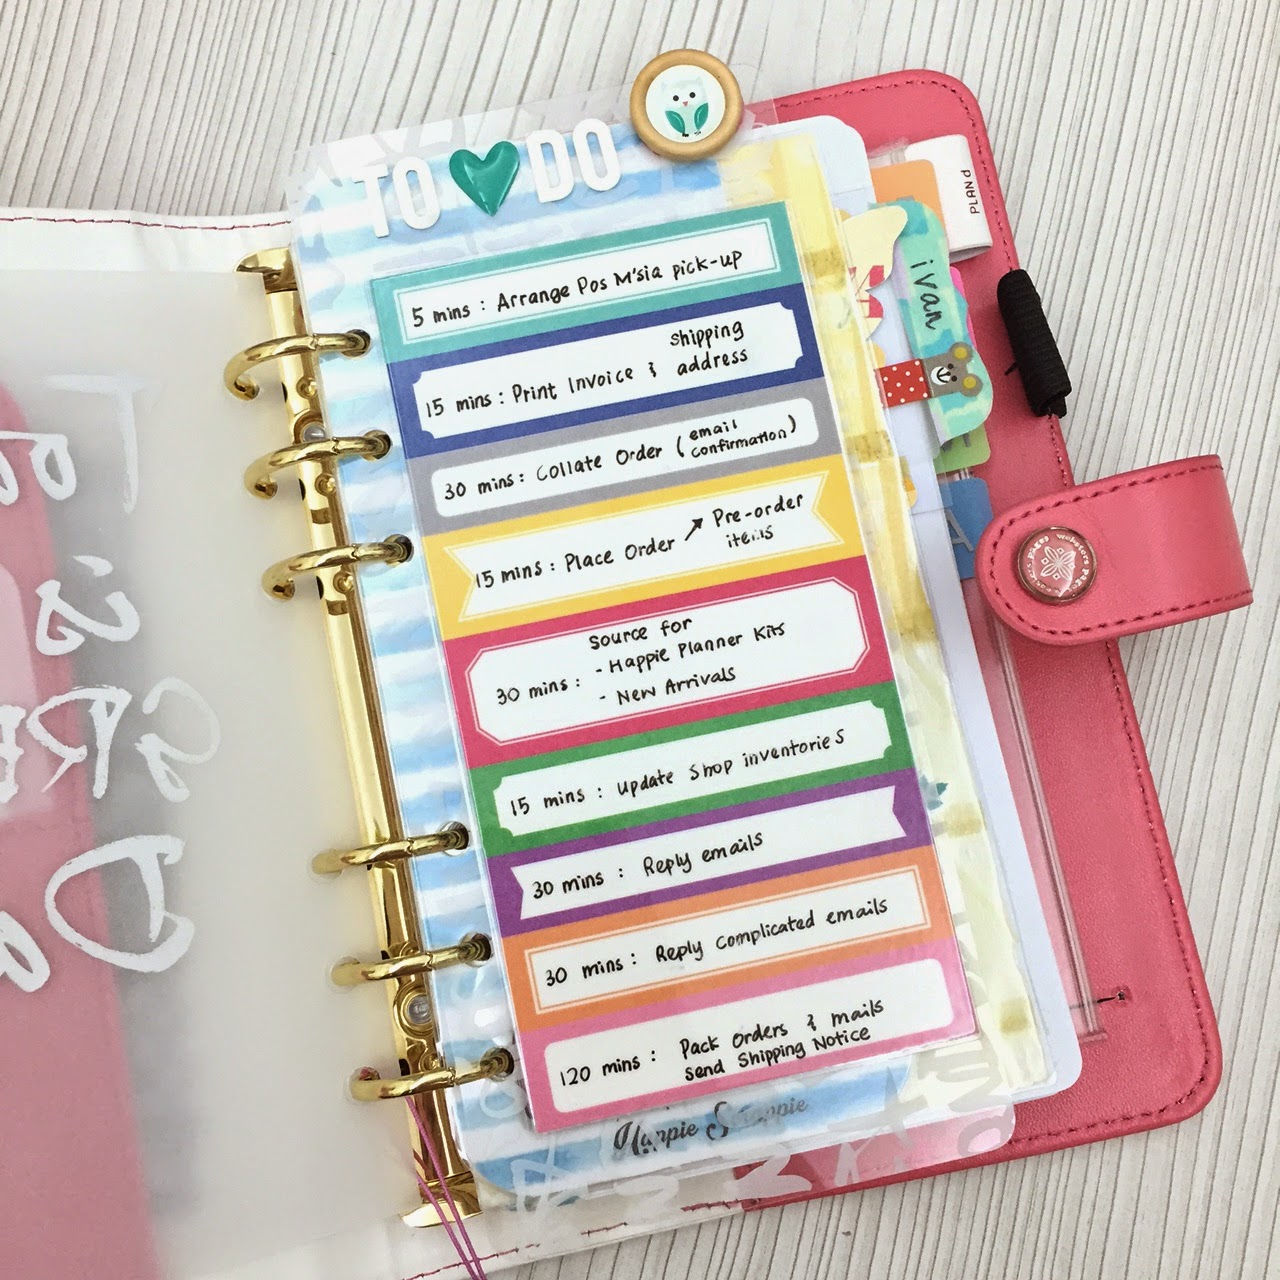


Ideally, my daily schedule should go like this if I stick to my daily to-do (or rather must-do for my online store) during working days. I try to work on Mondays to Fridays, and sometimes 1/2 day on Saturdays. I try, but sometimes when I have to pack Happie Planner kits (those days of the month), then I have to work on Saturday & Sunday (in the living room) while Ivan and the hubs were watching TV. I was trying make it up to them by working & packing in the living room to avoid losing the time spent with them.

Ideally (or as planned), I only have about 5~6 working hours per day during Ivan's nap time and also evening time when I have my in-laws help taking care of Ivan. We do not have any domestic helper at home so we are very much down to ourselves when it comes to taking care of Ivan, house chores etc). If I need to work extra hours, I have to either stay up late (its not uncommon to stay up till 3~4am) or wake up extra early (say 3~5am) to pack mails.


This is how a typical kit-packing day would look like if I am working in the living room - while Ivan was riding his bunny bike all over the living room. It is not uncommon that I was feeding him lunch while packing mails, and he was riding his tricycle. Sometimes he does fall down and cry (but some stickers and washi tapes would calm him down within seconds).


There was once he stole a piece of chocolate from the dining table while I was busy packing mails.


I would love to share some of the perks of being a work-from-home-mom ;) It is definitely more fun than working in the office 9-5 just because I have my little helper to keep me entertained + occupied.

1.  I am so blessed to be able to spend a lot of time with my little one - even when I work.


I am trying my best to keep my office / studio cleaner and neater so he has room to run around and play with his toys.


He likes to stay in the room with me even though sometimes I couldn't give him much attention that he craves for. A few rolls of washi tapes, stickers and my fauxbonichi would keep him occupied - well, for 10 minutes. 


Sometimes washi tapes are more fun than Lego!


He goes crazy when he saw my stash of washi tapes and stickers. He would take his own sweet time picking designs and colours that he likes. He particularly likes those with animals and cars design now.


Never too early to start them young right? Sometimes I will do scrapbooking / painting on the floor while he works on his own Crayola markers / crayons.

2. I have rather flexible working hours since I work for myself. It is flexible but I have to be really strict with time management so that I could get things done and ship the orders / mails on time. 


Most of the times I would need to run errands to get some supplies for my online store, and my little helper would always come with me after I pick him up from his Montessori.


It's funny how bringing him to the stationery shop / craft store like Spotlight makes him as happy as going to Toys'R'Us. He posed for this picture without us instructing him. He had so much fun picking his own pens, washi tapes and puffy stickers from a Japanese stationery shop.

3. Most of the time I get extra help when packing kits, doing stock take, and even making laminated dashboards. 


I love making dashboards for filofaxes but hate the lamination part. So Ivan has been a great help recently! All I need to do is to reward him with some cornflakes #cheaplabour


This is what happened when he was sick for a week but we had to work on orders and packing kits. Luckily he wasn't a fussy toddler when he is sick, he was just super clingy most of the time which I enjoy every bits of this. 


I lost count but i think we made about 60-80 pieces of dashboards in 2 days time - to include in the February Happie Planner kits as Valentine's gift to the lovely subscribers. They might not be perfect (since these are made with help from a 23-month-old) but its the thought that counts right?


I also have a sexy cleaner helping to clean up the studio this weekend. I bought this mini broom from Daiso as he just loves loves loves sweeping the floor. And we are in the midst of potty-training him, so there is a washroom next to my studio is super handy.


He also helps with stock-taking - and sometimes misplaced the store items ;) 


Picking up punched bits (from the laminated dividers) and stray sequins is just perfect for training his motor-skill.


And all the rubbish goes into the pink Hello Kitty bin.


A clingy toddler also means that he has to be in the picture whenever I am taking Instagram pictures.


I have two monitor for my Macs - Left is for me to do work while the right screen would come in handy to play his favourite nursery rhymes on Youtube when I need to work in front of the computer.


And this is my view when I am working on emails with a toddler on my lap.

4. I decide and work on my own schedule - I have always wanted to work slightly longer hours but the pregnancy #2 just made me so sleepy all the time. I often went to bed same time as Ivan around 10pm and also take nap when he naps. Sorry that there are times it take so long for me to reply emails etc =P


 And here's how I track my working hours + sleeping hours using DIY Fish's LM-Hyperdex. I have tried my best to be as consistent as possible when it comes to tracking our daily schedule. The outer ring (big one) is to track my dailies while the smaller ring is to track Ivan's sleep time.


Here's what I track daily - mainly blue (sleep time) and purple (working hours). The key to success for using LM-Hyperdex is to track what is important to you, and not spending one whole day tracking every single activity and filling up the rings. 
p.s. You can get the LM-Hyperdex here (DIY Fish's etsy store) and also my shop.

5. Ivan is such a blessing that he hardly (almost never) makes huge mess in my room / messing up with all my supplies. As you could see here, he can easily reach for all the shop items, inks, paints at his height. okay, there was only once accident (pee pee on the floor) while I was potty training him.


A lot of people asked me how did I start my online store? And how did I manage my time. Seriously I don't know but I am so blessed that I started posting my work on Instagram after Ivan was born (less than 2 years ago) and some girls were asking if I sell the handmade books that I made, or sequin pockets that I stitched. After a few months of being tired sending individual invoice via paypal, I decided to start my online store selling some of my handmade goodies and the shop just started to grow since then. I don't have any secret for running an online store but I do learn that being your own boss means you have to very very disciplined with time management and work more efficiently. There are times I would end up surfing eBay, watching youtube and browsing Facebook when I should work on emails. 


I don't have the best system for tracking my inventories yet - but I am working on that with some help from my hubs and good friend ChanWon.


Random pics to show you one of the corner of my work desk - rainbow colour makes me happy and keep me motivated!


Most of the time I don't reply emails during weekends because I have sort of promised hubs that Weekends (and public holidays) are for family =) Nothing beats going for yummy brunch on a lovely Sunday.


I am also very thankful to have a supportive husband (and my in laws too!) - supporting my little business financially, and also does not say a word when it comes to my stationery & planner addiction. 


I am thankful for meeting this lovely girl - ChanWon via Instagram. She always goes extra miles to help me with packing kits and mails, and also taking care of Ivan.


I am so thankful for having so many supportive customers, friends and followers via instagram. So we are running a series of giveaway on my Instagram account to this month and this is one of the giveaway that I have team up with Cindy from Pelle Studio. Cindy makes lovely and colourful fauxdori in various sizes which you should definitely check out her Etsy Store here. And remember to follow me on Instagram (@happiescrappie) for more upcoming giveaways.

Xoxo,
Sam