Wednesday, September 26, 2012

Meow In Da House (Amineko)

This is the ta-dah moment that I can't wait to share with you all!

It's huge, isn't it?


Mr Meow loves my doggie Popcorn

Whoopsie... gotcha!

Mr Meow took up the whole bed here

The hamster, the meow and the dog get-together >_<

Been thinking of making this amineko ever since i started crocheting few years back but I am never persevere to complete a huge project like this. Love this cat to bits and it totally worth my 4 days of handwork + 7 skein of 100g yarn for this awesome meow~ using J hook (the largest hook size I have) and three bags of polyfil, small pebbles (to weigh the buttock and limbs down) lead to a 3ft tall amineko meow.  I have yet to name the meow yet... Any ideas? My mum suggested me to do this huge meow again in PINK and make them a couple. I guess I would need to stop crochet-ing thick yarn for a while as it really hurts my wrist! It's time to get back to my granny square blanket. 

p/s: I use the original super huge Amineko crochet pattern form this japanese website.

❤ XoXo 

Monday, September 24, 2012

September WIP

A lil' note for my dear husband who stalks my blog occasionally, WIP stands for Work In Progress.

Considering adopting another pet to be my new couch-mate

Good ol' Granny square blanket

My first attempt on a huge project!
Love the double posers in the household
A little napping wouldn't hurt
Sleeping in front of TV.... Do you do this too?

And more last minute projects for my wedding reception too.... =) Oh my.... I have only 1 more month to my big day!

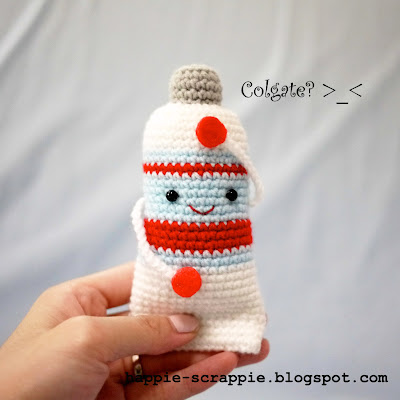
Toothpaste?

Guess what we have here?

Toothpaste with minty flavor?

The good ol' Colgate?

Noooo! You are wrong! They are watercolor in tube!

Watercolor in red

Oh no... Someone left the cap off >_<

And these two are my watercolor paintings for my previous children book illustration class at NAFA.
An apple dog inspired by the famous Pandapple
Watercolor painting is not so difficult after all and it helps relaxing =)

Another drawing inspired by my teacher. I love how the little doggie turned out. We didn't use watercolor during our first class, he taught us paint using batik paint and also food coloring which gives a slightly more vibrant effect than the watercoloring.

More crochet & amigurumi projects will be posted soon! XoXo =)

Tuesday, September 11, 2012

Amigurumi Pattern: Baby Seal Learns Swimming

I got this pattern from Luvly-gurumi's Etsy shop. I am addicted to all her cutesy amigurumi patterns now and I want 'em all! I do not know the difference between seal and sea otter. I have googled some pictures of the seals and sea otters here. Both are equally cute despite difference in sizes.

There was once I watched an sea otter learnt how to eat urchin on NatGeo. Too cute! 
Photo credit: ZME Science

The teary eyed baby seal.
Photo Credit: Whale Images

The not-so-cute leopard seal / sea leopard
Photo Credit: Open Water Pedia

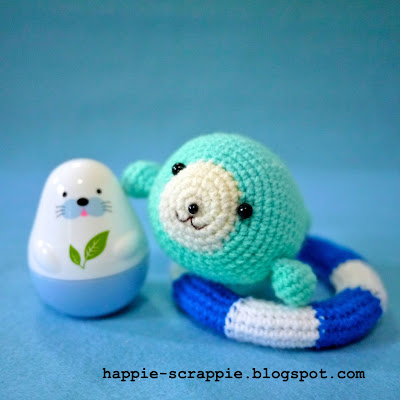
And this is my version of baby seal 

Baby seal learns swimming

With a bucketful of fish.Yummmm!

Hello! Are you a seal too?

I can do backstroke too!

Baby seal just loves his float & fish  

P/s: The pattern for the baby seal is purchased from Luvly-gurumi. I only created the swimming float and bucket on my own.

Here's the pattern of the float and bucket. No worries, the float isn't as intimidating as it looks. It's pretty easy-peasy and I love love love the color combination here.

NOTES:
1) Work in continuous spiral round; do not join rounds unless otherwise stated. Mark first stitch of each round.
2) To change color, work last st of old color to last yarn over. Yarn over with new color and draw through all loops on hook to complete st. 

Float x 1 (blue & white colour)
Start with white color; Chain 48 (loosely) and sl st
R1: *sc 6 <white>, sc 6 <blue>*, repeat 4 times (48)
R2*(sc 2, inc 1, sc 2, inc 1) <white>, (
sc 2, inc 1, sc 2, inc 1) <blue>*, repeat 4 times (64)
R3*(sc 3, inc 1, sc 3, inc 1) <white>, (sc 3, inc 1, sc 3, inc 1) <blue>*, repeat 4 times (80)
R4 - R6: *sc 10 <white>, sc 10 <blue>*, repeat 4 times (80)
R7: *(sc 3, dec 1, sc 3, dec 1) <white>, (
sc 3, dec 1, sc 3, dec 1) <blue>*, repeat 4 times (64)
R8: *(sc 2, dec 1, sc 2, dec 1) <white>, (sc 2, dec 1, sc 2, dec 1) <blue>*, repeat 4 times (48)
R9 - R10*sc 6 <white>, sc 6 <blue>*, repeat 4 times (48)
Fasten off, leaving both blue and white tails for sewing. Sew R1 & R10 together.

Bucket x 1 (Grey)
Start with grey color; make adjustable rings
R1: 8 sc in rings (8)
R2: inc 8 (16)
R3: *sc 1, inc 1*, repeat 8 times (24)
R4
1 sc in each stitch (back loop only) (24)
R5 - R8
1 sc in each stitch (24)
R9: *sc 5, inc 1*, repeat 4 times (28)
R10 - R13
1 sc in each stitch (28)
Fasten off and sew the end.

Handle for the bucket x 1 (White)
Start with white color, chain 20, sew both ends to the bucket.

Cut some felt fish to fill up the bucket and you're done! Told ya the accessories for the baby seal are super-duper easy to make right? 

Monday, September 10, 2012

Moshi Moshi

I haven't been scrapping at all lately, been addicted to crocheting again after ages. Been really sick recently and haven't been going for shopping for weeks. After crochet-ing days and nights, my amigurumi dolls been popping out everywhere in my room now.

Its been raining and raining recently. And this cute mushroom just popped up on my craft table.

Mushroom says hello to the new owner! I made this for a crafty friend whose birthday is coming up real soon. I hope the mushroom will make her day & brighten an usual craft table.

Insert a used water bottle to make it sturdier. Perfect for keeping paper clips and mini junks.