Showing posts with label Cameo. Show all posts

Wednesday, January 30, 2013

Can't Believe It's Week 4?!

Time flies and we are already into Week 5 of 2013. It took me a while to complete the title card for my PL week 4 but I didn't quite like how it turn out. Never mind, I will still stick with it.

Cut the title using my cameo and layer some pattern paper underneath. Very simple title card which explains nothing much happens during my Week 4. OMG, can't believe week 4 has already ended!!!!

It seems that I can pretty much work with any type of pocket sleeves. Be it vertical or horizontal. I always print out all my photos first then only decide what pattern papers to use. I have forgotten to take pictures over the weekend probably due to lack of sleep and I am having terrible leg cramps. 

Mainly dominate by loads of doggie pictures this week. I am slowly getting the hang of doing PL now and this spread was completed under 2 hours, after I printed the photos and made my title card.

Been having fun using cameo for this week spread. 

My favorite pocket for this week spread, just because it's in pink!! and I have my favorite die-cut HELLO here. 

Using some scrap card stock from my previous layout. keep adding those die-cuts and circle stickers that i made using my Cameo.

One of the layout i made in Week 4. Loving the title: It's the little moments that make life big. What's not to love about all these pretty colors?

How's your project life going on? I am gonna off to make title card for week 5 now. Thanks for looking. XoXo.

Wednesday, January 16, 2013

Woo Hoo~ Project Life Week 1

Yes! You got it right, I am finally jumping into the Project Life bandwagon after resisted it for almost a year. I just feel that that this project requires huge huge commitment to record you daily life and do at least a weekly spread. I resisted very very hard initially as I know I am expecting a baby boy in mid April and life gonna be real busy coping with a newborn eh? Then I think twice, isn't this the most wonderful moment that I gotta record it with photos, pen & papers? 

So I told Ethan about this awesome project that he named it Life Project. Sounds like if you don't do this project it is gonna be real life-threatening, LoLs. We even off to Scraplicious to check out the Project Life Core Kit and ended up we resorted to pulling my own kit using my stash.

I am still very much struggling with my cover page. But I know I am gonna use this amazing cut files from Tina Azmus for my both my planner & PL cover page!

Shopping needed to be done before the commencement of a huge project right? I picked a hot pink & bright orange WRMK leather album to hold my spreads. Reason for picking pink? Just because I am expecting a baby boy and I could foresee that my house would be overwhelmed with different shades of blue in near future. So at least I can decided I need more PINK for my craft area right? ;)

I had so much fun working on the title card for Week 1 and Week 2. Pardon my crooked stitching but I think they look kinda cool not being straight though, The title cards pretty much spell out the color combination that I want for my spread - Blue, teal, yellow, green, grey and a hint of red/pink, By the way, if you squint your eyes on my Week 1 card, you will notice I actually stitch on the heart wood veneer. Not sure how it went through but I couldn't stitch through the foam thickers. Any tips? I have already changed to a much thicker needle!

Tadah! here's my Week 1 spread. I am quite glad how it turned out. I found that the toughest part for doing a PL (to me at least) is organizing the daily photos and choosing which photos to be printed / included. Not so much of pulling the embellies, journalling cards and filler cards together. I am trying very hard to keep it as flat as possible as I do not want to end up with a bulky albums.  

Week 1 spread: Love using bits of stamps here n there.... I tend to stamp more when I am working on PL and Smash Book than on a layout.

I added some stitching here and there and realize it doesn't give much impact to the spread since everything is kept in the pocket but I still couldn't help using my sewing machine. I hand-written all my journalling as I am too lazy to pull out my typewriter. And yes, i realize it isn't easy to take picture of those spreads with their plastic sleeves on. Gotta avoid those glaring spots. 

Off to work on my Week 2 spread, spring wreath for our front door and some canvas painting. Thanks for looking. XoXo.

Tuesday, December 18, 2012

So Cute It Hurts

Been really busy with my Cameo. Tried cutting frosted glass sticker that I gotten from my brother. It cuts like butter and super easy to peel-off although my blade is kinda blunt. Stick this 'EAT/ DRINK/ BE MERRY' fonts on my kitchen glass door.

I am also busy trying my hands on Derwent Inktense Color Pencils after reading the recommendations by Jennifer Mcguire. One of my scrappy friends got the Inktense 36 for me in ArtFriend Singapore as it is only half the price selling @ Simon Says Stamp. I am amazed by the depth of color and the immediate ease of which these pencils mix with water. The only drawback is this set of color (even the 72 colors) doesn't come with lighter shades e.g. light pink, light blue etc. 

And my cameo has been busy working on creating layouts and cards too. Here's one of my recent layouts with Junior's candid photo.

Mainly using Studio Calico November kit: Sock Hock & Poodle Skirt. I try stitching the tabs using thicker needle and much slower speed and so glad that it works! I will try stitching chipboard alphas soon and see how it goes.

The cameo cut-out titles. Layer with misted kraft card stock.

very minimal layering here as I want the title & the pretty pattern paper to be really really loud. Oh by the way, this 'fave heart' is part of the elements from Paislee Press 'You Are My Fave' digi kit. I converted it into cut files.

That's it for today! Off to coloring my stamp images again. XoXo.

Friday, November 23, 2012

Happy Little Cards

When I am lack of mojo to scrap or I am just too intimidated by the 12x12 LOs (fellow scrappers, I'm sure you get what I mean, hehe), I would start looking for my stamp sets and see what are the cute little cards that I could come up with.

Here are a few simple cards that I completed during my sleepless nights and feeling a little crafty:-

1)  A Pick-Me-Up card for my dear husband.
Hello hubby if you are reading my blog! *Waving* I used mainly Amy Tangerine Sketchbook and Paper Smooches Vegtastic stamp set. I had so much fun playing with my embossing powder & heat gun ever since I have my own craft area. Tools and supplies are always around me so I am more keen to use more tools when I'm crafting.


2) A super belated Birthday card for my scrappy friend, Cheryl. TO be honest, I made the card much much earlier, but I only managed to pass the prezzies + card to her a month after her 21st birthday. Happy belated birthday, Cheryl! :)

The stamp set is from Lawn Fawn, Happy Summer. I stamped the talking ant upside down so I gotta stamp another talking ant and popped it up on the card. I love adding stickles to my cards nowadays. Maybe it's chirstmas real soon, don't you agree? 

I am loving the inside of the card. I splattered 3 different colors of Studio Calico Mists. I think I am gonna make another LOs or cards with this cute splattered background.

3) And finally it's some christmas-ie cards. I just realized I do not have christmas-themed papers nor stamp sets in my stash. I seriously could not believe this when I have several boxes of patterned papers and stamp sets.

So I just make do with some not-so-christmas-ie papers from Crate Papers, die cutting the penguins using my Cameo and stamp some christmas sentiments. It ended up looking kinda Christmas-ie after adding some Stickles and Silver-n-Gold embossed fireworks patterns (which I think it resembles snowflakes, hahahaha) right?

4) I am loving the bubbles mask from Studio Calico so I misted the background way before I knew what I wanted to do with the card. Adding some green papers, Red stickles and twines, then we could have a lovely christmas card without any christmas supplies in our stash right?


I had so much fun digging through my stash trying to make my cards look more christmasy and am happy that I finally have used up some of the supplies. Okay, I gotta be frank here....  making only 4 cards here definitely have not make a dent in my stash considering The rate i build up my stash. Isn't that a norm between scrapbookers and card makers?

Thanks for dropping by. XoXo.


Tuesday, July 10, 2012

Productive July

Hello Hello! I am still scrapping and smash*ing but I am very lazy to upload my layouts to the blog. It's Great Singapore Sales in Singapore right now but I haven't been shopping much, be it clothes / books / scrapbooking supplies. I have been working very very hard  & party-ing real hard too!

Firstly... I would like to thank Paper Crafter's Library for featuring my SMASH* book post. And thanks Madey for highlighting the blog post to me ^-^


I received my Studio Calico June Kit - So Cal  approximately 3 weeks back but I barely have time to play with it. And I wanted the speech bubbles stamp from Add-on 4 - Venice Beach so badly but I missed it twice during the pre-sales for subscribers and also on the actual launch. It was sold out less than a minute after it was launched! Can you believe that??? So I have learn my lesson and for July kit, I switch on 2 computers to click the 'add to cart' button on the pre-sales day to make sure I got all the add-ons that I want! But still... I missed out on another add-on kit in July too >_<

These are the Main kit & add on that I got in June... And make a wild guess.... How many layouts have I created out of 'em?

June Main Kit - So Cal

Add-on 3 - Santa Monica

I created two 12x12 LOs, four 8.5x11 LOs, 1 mini album + 1 mini 5.5x5.5 layout. I used mainly the Studio Calico June Kit, Paper Smooches stamp, Stamps from SC Summer School Stamp & some pretty October Afternoon 9-to-5 papers. I am now a happy scrappers who have at least 2 more LOs to complete in order to use up my June kit while waiting for my July kit.

1) Singapore River Cruise 
This layout is made using the scraps that I have left after making a few layout from June Kit. I tend to look for Orange, green and blue scraps to match with the photos. I am loving the soft / pastel color combination here. Too lazy to set up the sewing machine so I drew the white stitching line instead. Loving the pics that I taken when my parents came to Singapore to visit me a week ago. <3

Loving the Paper Smooches stamp image that I color with color pencils and stickles!

I draw a few white lines using Uniball White Pen to make the glitter foam alpha poped out. 


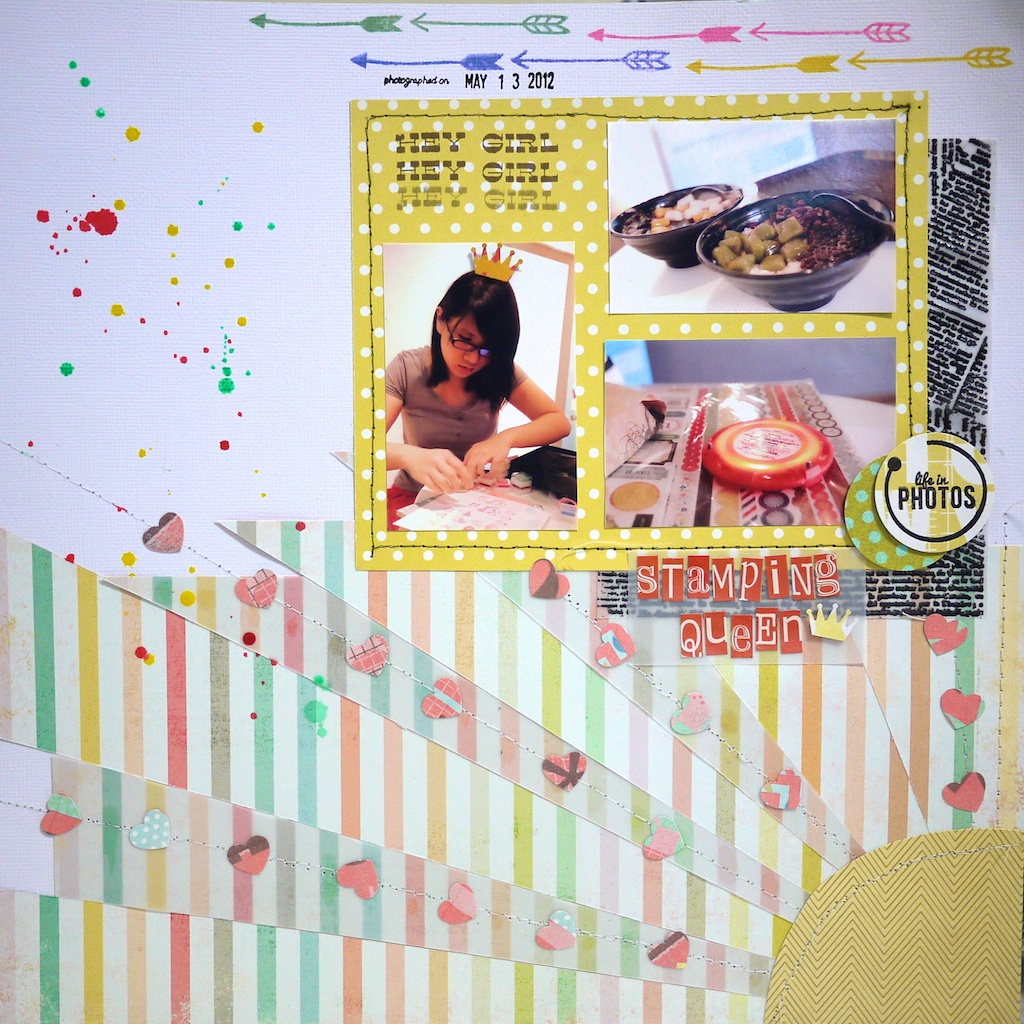
2) Stamping Queen - A layout dedicated for my scrappy friend - Cheryl Leong
This layout is created by following Studio Calico Sunday Sketch 8/7/2012. And this is my first time using sewing machine on my layout. Love the subtle texture that the stitching added to the project. It took me quite a while threading my sewing machine though. 

Love love the BIG impact of the starburst on the bottom of this sketch. I flipped the sketch to the right instead.

I added a lil' crown to the picture of the stamping queen >_<

First time trying to emboss on vellum too! you could see that I am crazy over vellums by now! <3 the dreamy (yet subtle) effect of the vellum.

Super cute starburst / sunburst layout. 

 3) Canopy
This LO is scrap lifted from a card that I saw from Studio Calico Summer School Stamp. I just received my Hero Arts mid tone ink and have been stamping Hello on a piece of white pages.  So I just simply arrange the Hello word bubble and that's how quickly I completed this layout. Misted Green & yellow here as the instax were taken during our breakfast outing at Bishan Park. 


Colored the arrow stamps randomly with distress marker. I am now thinking of getting a complete set of distress markers!

 4) J & S
I am loving the 8.5 x 11 scrapbook pages. I could complete the smaller scrapbook pages with lesser time and loving the compact size of these pages. The MME paper is very very pretty on its own so I just added some chipboard stickers (banner) + some stamped clouds + stamped bicycle and ta-dah! The colorful clouds are my fave in this layout!


The cute book clip is from Basic Grey and I gotta confess. The black ink splatter is actually stamped using Swiss Girl Design stamp. Same effect as normal splatter the black mist but minus the mess!

5) Bintan
This pattern paper is my fave paper in the June kit. It took me quite a while to decide on which photos to go with it. And this is my very very first time using my new baby Cameo to cut out the silhouette title here. Love it!

Add stickles to pop up the cute birdie! I have a few pictures from this Bintan trip to be scrapped. Stay tuned!


I have a layout, a mini album & a card that I made for my girlies at work. Will share those projects with you in a day or two. Thanks for dropping by =)