
We also want to remind you the August kits will be revealed on August 12th! Citrus Twist has an amazing special going on right now for new subscribers: purchase a 3-month or longer subscription (PL or Main Kit) and get a free goodie bag of embellishments ($20 value). And if that's not enough of a perk, we also want to remind you that once you have subscribed for 12 months, your 13th kit is FREE (you just pay shipping on the free kit).
Now for the Prizes: Two lucky commenters who hop to ALL 10 design team blogs will be entered to win one of two $10 gift certificates (GC) to the Citrus Twist Store.You just need to leave a comment on EVERY designer's blog to be entered to win. We would love to hear about something you are celebrating or you can leave us some love. After visiting all 10 DT blogs, come back to the main Blog Hop blog post and comment that you visited each blog and and your name will be entered into our contest. Comments end Monday August 12th. Winners will be announced on the main Citrus Twist Kits blog by Friday August 16th.
Let's get started:
Amelie Mordret
Angie Gutshall
April Joy Hill
Gina Rodgers
Jen Boumis
Kasia Tomaszewska
Melissa Stinson
Nina Ostermann
Sandy Ang
Waisam Ho <<— I'm here!
Citrus Twist Kits <<— Stop here next!
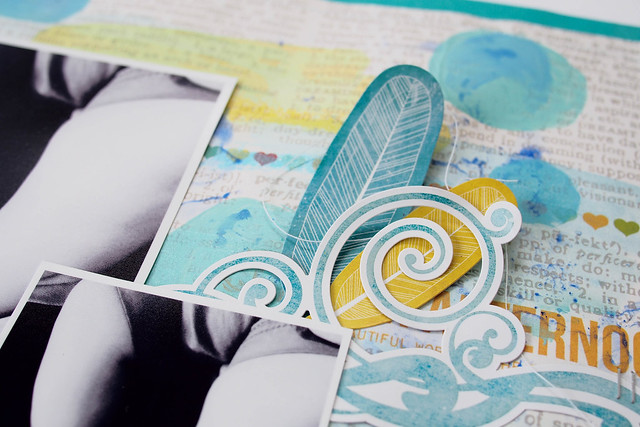
Here is my celebration layout I created using Simple Stories paper & Echo Park Element Stickers from August kits (Pattern Paper Add-on & Add-on Embellies). I took this photo of my boy's chubby feet on his 4th month birthday. Yea, I know 4th month birthday is weird but my father in-law insisted to throw a party for him when he is 120 days old. I was told it is part of chinese-hokkien culture to celebrate baby's 4th month old (that I have never heard of LOL). And stay tuned! I have a mini tutorial to show you how I altered the background of this layout.
p.s. I just love this pair of cute little feet that rock my world.
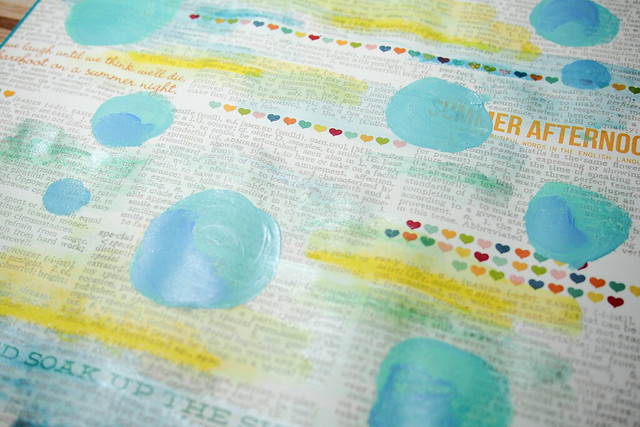
I was going a little mixed media and keep-it-simple for this particular layout. Loving how it turned out and this is my favorite layout by far! Okay, I know I have been saying this every time I created a new layout. >_< And I am digging' blue/teal color at the moment. Maybe my boy has converted me from pink/peach color lover to a blue/teal color lover.

Close-up of the layout : I created a little banner pennant with the flags & banner from the sticker sheet. And I used Tim Holtz distress paint to tone down the color a little. Same goes for the blue chipboard letters - I brush only the bottom of the letter to create an ombre effect for the title.

Layering some of the stickers. I made the sticker less sticky (or remove the adhesive) with some baby powder and glue them down with liquid glue.
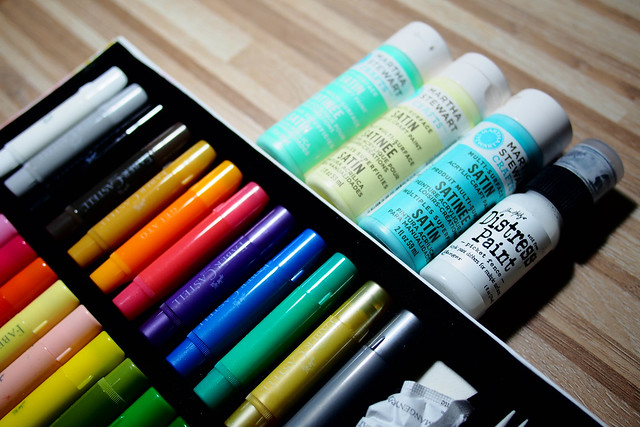
Supplies that you need for altering / creating this mixed media background:
- Gelatos® (Add them to you cart at Citrus Twist store and ship free with your kits!)
- Acrylic Paints (I used Martha Stewart here)
- Tim Holtz Distress Paint in Picket Fence
- Water color brush
I doddle circle of various blue / teal shade on my paper. Do not dilute with water, you need really thick consistency so that the painted circles will resist the Gelatos® later on.
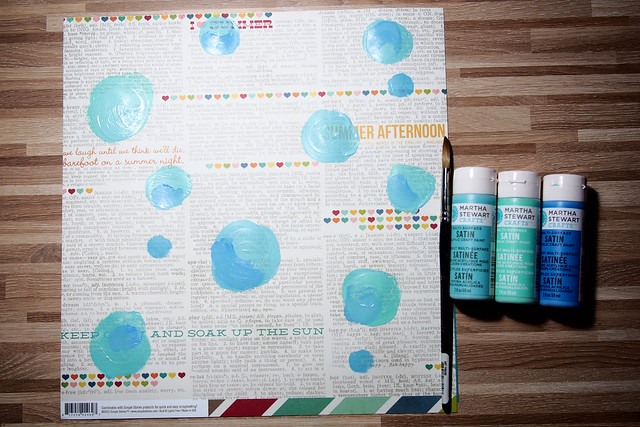
Once the acrylic paint is dry (make sure the paint dry thoroughly) then start doodle some lines on the paper. I use yellow, blue and teal here.
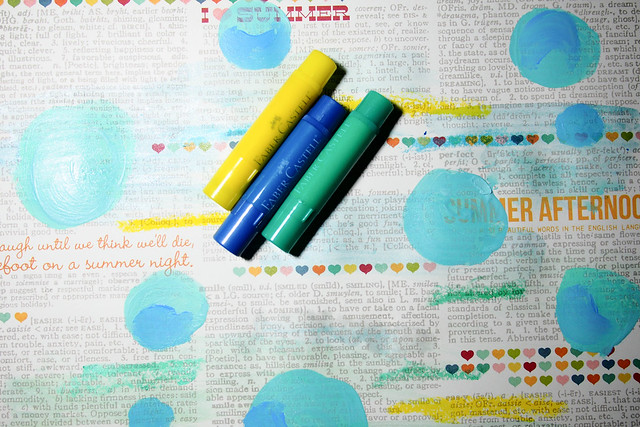
Then use a wet water color brush to blend the Gelatos®. Add more Gelatos® if you want to. The blue & teal are the metallic color from the Gelatos® gift set.
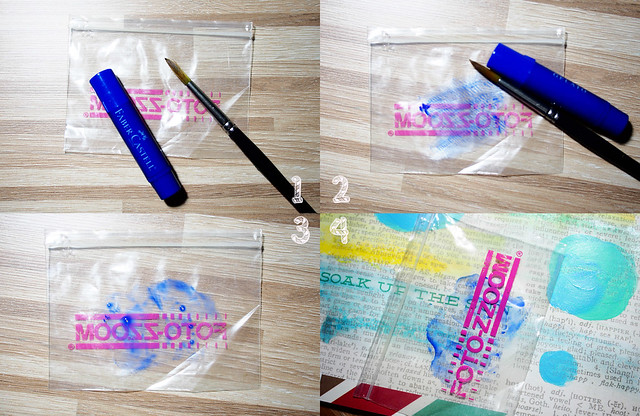
And here's the fun part that I have been dying to share with you! Easy-peasy way to create water color background in a non messy way.
1. You need a piece of plastic packaging, water brush and Gelatos® (or even mist) of your choice
2. Use Gelatos® to doodle on the plastic packaging
3. Add water
4. Slap the packaging onto the paper. (repeat again for as many times as you like to)
5. Use Tim Holtz Distress Paint in Picket Fence (white) to tone down the colors that are too bright, (step not shown here)
Mind you, this is really addictive!
Alright, that's my mini tutorial for creating a mixed media effect layout. Do try the technique out and link me up if you created a project with this. You could tag me on Instagram (@happiescrappie) too!
And don't forget to hop back to Citrus Twist Kits blog. Happy blog hopping!

J'adore!!!!! C'est trop beau!
ReplyDeleteOoooo, I love your background!! Thanks for the tutorial too--I'm going to try it soon!!
ReplyDeleteWonderful page! I adore the photos....I can't tell you how many photos I have of my children's feet...there is just something about chubby baby legs/feet, no? And thanks so much for the little photo tutorial on how you created the background, it's beautiful!
ReplyDeleteThe tutorial is great! Layout is super cute!!
ReplyDeleteGreat tutorial! Thanks for sharing :)
ReplyDeleteI love the fun splashes of color and the sweet photos too!
ReplyDeleteWhat a great idea for the watercolors.
ReplyDeleteThose feet ARE precious! I'm glad I found you on the CT bloghop!
ReplyDeleteLove those photos so cute thanks for that tutorial too!
ReplyDeleteLove love love this! iOS need to use my gelatos on my layouts! Thanks for the tips!
ReplyDeletegreat tutorial, thankyou
ReplyDeleteI love that you've been working with a lot of mediums recently! Cute toes, and fun tutorial!
ReplyDeleteFun way to add the Gelatos to the pp! Cute page too!
ReplyDeleteI was just thinking of joining a kit club. This is awesome!
ReplyDeleteGreat use of multiple mediums
ReplyDeleteWonderful work and great tutorial. I really enjoyed seeing your process.
ReplyDeleteI love how you toned down the bright elements.
ReplyDeleteWhat a wonderful tutorial! Thank you!
ReplyDeleteYour work is always so pretty!
ReplyDeleteIt's beautiful! I wish I could work with mixed media like that!!
ReplyDeleteThanks for the tutorial! I love the mixed media look! I just might have to try it out! :) Awesome page! I love the black and white photos!
ReplyDeletegreat idea, thanks.
ReplyDeletePretty layout! Love the colors! Can I check where you bought the gelatos gift set from?
ReplyDelete