Showing posts with label Tutorial. Show all posts

Wednesday, February 25, 2015

Planners | More Pockets for Your Planners

Hello there, today I am gonna show you how you can never have enough pockets in your planner(s).  You can read previous blog post by Florence on what she store in her pockets + an awesome tutorial by Candi on how to make pockets for your planner. I am gonna show you even more pockets, just because it never hurts to have some pockets to hold your bills/receipts, project life card, to-do list etc right? Firstly, I made some pockets using scrapbook papers using Candi's tutorial. I am using personal sized planner from Kate Spade and also Webster's Pages Color Crush (in Sky) so my pockets look much smaller than Candi's (as she is using an A5 equivalent Kikki K planner).


I just cut down a few pieces of scrapbook papers to the size of personal inserts. You would need scissors, paper trimmer, tape glue and hole punch for making pockets.


I am using the smaller pieces of scrapbook papers / vellum in the above picture to make the pockets. Even project life cards are perfect for that!


And this is how it looks like after i glue the smaller pieces on the dashboard. I added machine stitching just for fun and love the texture! Don't worry, stitching on paper with sewing machine is kinda easy and fun.


This is the front of my March dashboard (the printed version will be included in the March Happie Planner kit)  - i drew the Mason jar and fussy cut it myself and add a piece of vellum behind to use as pockets to hold some loose note papers.


Love these note papers from the Cocoa Daisy Day Planner - Feb kit. I am a sucker for everything with hearts.


You can also use the pockets to hold receipts / bills. But remember to take them out to file them else your planner gonna be bulky!


I am using a vellum envelope (trimmed down to fit the personal sized planner and punched holes) then it can use to hold some loose change for my 52 weeks money challenge.


I also use the pockets to hold some project life cards as i often use them as to-do list / writing quotes or to make the planner pages more colourful.


Here's the pocket that I made with project life card. I only stitch 2 side of the card to the dashboard so that it is easier to keep stickers or sticky notes in and out.


More ideas for pockets - most of your filofaxes / planners might come with zipper pouch / top loading pouch (which you can find here). But I love fun and colourful stuff so I use a normal zipper pouch / slim pen case, punch holes and use as zipper pouch in my planner. I even have matching colours for all my planners.


And some interesting finds: sticky pockets - The pockets are like post its notes which you can stick them on paper and they are removable. such fun accessories to the planners right? I hope you had fun reading my post about what you can use as pockets for your planners. Thanks for dropping by! 

Xoxo, Sam

Friday, February 13, 2015

Planners | How To Decorate Midori / Fauxdori Notebook


Hello everyone! Today I am sharing this over at Freckled Fawn blog on how I decorate inserts / notebooks for Midori Traveller's Notebook (in short TN) / Fauxdori. The original Midori TN inserts always come in kraft colour cover which pretty much beg you to decorate and personalise it. You can also decorate your favourite Moleskin notebooks or Field Note using the same method. I am someone who can't live without rainbow, so I decorated all my midori / fauxdori inserts with patterned papers, washi tapes, stickers and stamps.


So now, let's grab some of your favourite washi tapes, patterned papers, stamps and stickers and decorate your notebooks with me. Decorating the notebooks can be really therapeutic and easy - would not take you more than 10 minutes for each book ;)

1) Decorate with washi tapes.


You can choose to cover the cover partially or in full, with tonnes and tonnes of washi tapes. Here's what I have done with mine. The one on the left is decorated with MT masking tapes and Freckled Fawn washi tapes. Part of the kraft cover peek out and make the pastel colour washi tapes pop. I also added some epoxy stickers and letter stickers to make it even more personalised as this is my pregnancy journal ;)


The other two notebooks are of smaller size - same size as Filofax personal sized inserts. The one for my 'SHOP' I cover it up with pastel skinny washi tapes (you can get it here) in stripes. Added a piece of star-shaped sticky notes to put down the letter sticker 'SHOP'. The one with camera - I just cover the cover with 3 different rolls of washi tapes - randomly, then stamp the camera stamp with Staz On black ink.

2) Cover it up with patterned papers


This is probably the quickest and easiest way to cover up the kraft cover. I cut the patterned papers down to the size of the cover (a little bigger than the cover to get complete coverage) and stick it to the cover with tape glue / glue stick.


I also like to add wood veneers / stamps to the simple cover. This would only take me 5 mins to decorate each notebook.

 3) Decorate with stamp


I love the contrast between kraft cover and colourful stamped image. I stamp the heart stamps over and over again using Freckled Fawn February Oh Deer Me kit with Versacolors. I like that it actually looks like a piece of patterned paper. The other one I just stamp with a stamp set from Amy Tangerine that say Happy Place and I added my hand writing 'to brain dump' as my brain dump journal.


4. Stitch your stamp ;P


This is one of the cutest and unique way to decorate your notebook cover. You can just stamp the image using a lighter colour ink pad (say grey colour) and poke holes, add the stitching with embroidery thread. I am using Moleskin Cahier for the photo above. I have a detailed step-by-step tutorial that I written back in May 2014. I hate sewing and stitching, but I did have fun personalising my own notebooks with embroidery.

So these are the ways I use to decorate my notebooks and particularly, inserts for my fauxdori / Midori. Which one is your favourite?

Thanks for dropping by and I hope this post would inspire you to start customising your own notebooks.

Xoxo,
Sam

Friday, December 26, 2014

Planners | How To Make Your Own Rainbow Divider Tabs

Hello Everyone! I have a a simple step-by-step post on Shop Evalicious blog to show how I make my own planner dividers and use various Shop Evalicious stamp sets to make own own patterned papers + rainbow tabs. If you look closely, those tabs aren't perfectly aligned / have straight edge. I am such an IM-perfectionist! *LoL* But those rainbow colours are seriously to die for.


This is a very photo-heavy post so I made the step-by-step into a simple collage.


This is basically a set of B&W dividers for my Kate Spade planner (equivalent to Filofax in Personal sized) with some colourful rainbow tabs. I was inspired by Erin Joy's video about her planner setup for 2015. I love how she set her filofax up in simply B&W.
1. I was looking for B&W patterned papers from my stash to match my black Kate Spade planner.
2. Okay, I cheated, I sneaked in 2 pieces of paper with a tiny bit of pastel colour.
3. Then I decided to stamp repetitive patterns to make my own patterned papers. I use Love Today stamp set to make this divider + add a tiny stripe of polka dots MT tape.
4. Then I wanted to have a typewrite & Banner patterned divider - so I made my own using Field Note Clear Stamp Set & Daily Life Clear Stamp Set.
5. Here's a peek of the 3 dividers that I made with stamping repetitively.
6. I couldn't stand that it is only in B&W so I added some paint splatter and water-colour using Distress Stain & Peerless Watercolor.
7. Then I used the inserts from my Kate Spade planner to use as a guide to punch the 6-holes for all the dividers.
8. I decided to stamp a few banners using Solid Banners Stamp set with various Versacolor ink pad.
9. I finally picked out 7 banners that I like which is in the following colours - form Blue to pink to yellow and green.


I stick the page tabs that I made with stamped banner with tape glue. Then send them to hot laminate. p.s. I took pictures of the dividers before I laminate them to avoid the glare. 

And here's a peek of the individual dividers. 


Thanks for looking and if you are interested, do check out the list of supplies that I used to make this set of dividers.

Products Used:
  

Xoxo,
Sam

Saturday, May 24, 2014

Tutorial⎪Printing With FujiFilm Instax SHARE Printer & iPhone

Hello there, I know many of you have seen me posting pictures of my FujiFilm Instax SHARE Printer on my Instagram so often. I am totally smitten with this baby the moment my brother got it for me. And I even brought it with me during my Japan trip in April. 

I have also crochet 2 instagram-inspired cosy for my Instax printer to prevent it from being scratched. If you are interested in getting one for your printer, kindly drop me an email here: shop.happiescrappie@gmail.com


Here's the list of my must-haves in my handbag when I was travelling in Tokyo: 
1. iPhone - not pictured here as I was using it to take this photo
2. Instagram pouch - gifted from my girllie and I use it to store my knick knacks
3. Instax SHARE SP-1 printer and Instax Mini films
4. Power Bank
5. My beloved camera >> Olympus OMD-EM5 - I have never own any DSLR in my live but I do have 2 four-thirds cameras.
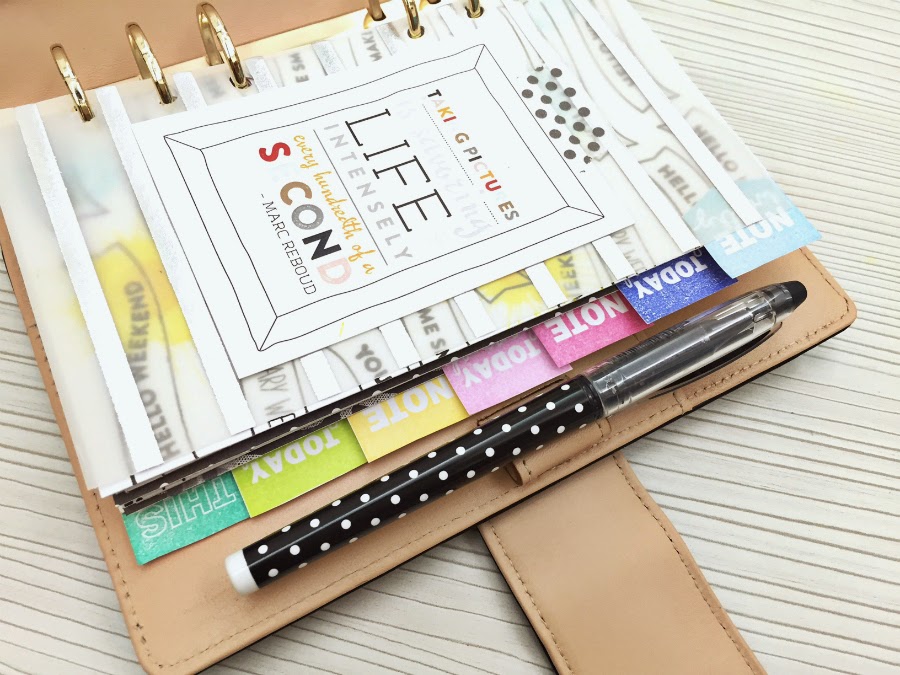
6. My mini travelogue - that I stitched the cover my the Moleskin Cahier. You can see the full blog post here

p.s.: I got the Mickey hand camera strap from Tokyo Disney and it is just tooooooooo cute that I had to get one for my brother too!


Peeking into my mini travelogue - Started this mini to journal the itinerary and highlights of the trip - what we saw, what we dis, and where we went. I also have dedicated a section to jot down what I have bought - from where and also the prices. Plus this mini notebook has a mini envelope at the back where you could slot your receipts or business cards. Love Love Love. 

Since I have journal down the highlights of the trip in my travelogue, I can always refer to this whenever I work on my mini album for my Japan trip in the future. 


I have read some of the reviews saying the users always end up with over exposed photos when printing from Instax SHARE printer. I wasted about a box of my instax film to experiment with the brightness, contrast and colour to find out how to do it perfectly. Well, at least I think after I edited the photo and print them out, they look perfect to me! 

Ok, let's me show you how I edit my photos using PicTapGo app on my iPhone. You can definitely use other photo editing software on your phone, but I love PicTapGo because it allows users to adjust the level of editing. PicTapGo is a Paid app which can be purchased at USD1.99. For free app, you could use Snapseed which also allow you to adjust the level of editing according to your preference.

Both apps do wonderful job in editing photos and I normally just bump up the brightness and crop the photo before I post on Instagram or Facebook. I normally stick to PicTapGo nowadays because - ever since Snapseed updated their app, they always pull out photos from the VERY FIRST photo in my camera roll. Definitely NOT FUN (sorry for the caps here!) when I gotta scroll through a few thousand of photos to look for the most recent photos that I have taken and wanted to edit. I always have at least 5000 to 7000 photos on my iPhone =P Other than this, SnapSeed is a wonderful app that I used a lot before I decided to invest my USD1.99 in PicTapGo ;)

I am using a cheesy photo of me and my hubster during our Japan trip. Bear with me ;P So this is how the photo look like, without editing, when I take photo in a well-lit place. Tips 101: always try to take photo in a well-lit place especially you are using front camera which has lower resolution. 


Then now I open the photo in PicTapGo app. As you could see in the screenshot, II always use these 5 filters only - Crispity, Brightside, Warm It Up, Lights On & Cool It Down. All you need to do it swipe your finger the adjust the intensity of each filter according to your preference.


Here's the side-by-side comparison of the no filter photo and edited photo:


1. Without Editing : No Filter. I don't normally print out my non-edited photo on my Canon Pixma or Instax SHARE. 
2. To Print on Instax SHARE >> Use Filters: Crispity & Lights Out. I like to bring down the brightness  (using Lights out) and increase the saturation of the photo (using Crispity) before I print on Instax SHARE. This is because I always end up with over-exposed / washed / pale photo when I print unedited photos. So I came up with this solution.
3. To post on Instagram or other social media / printing on my Canon Pixma >>  Use Filters: Crispity & Lights On / Brightside. I also use Warm It Up / Cool It Down to adjust the white balance of the photo and I *think* i always edit my photo to be a little warmer (yellowish). 

I know the middle photo looks awful here (or even on my iPhone screen) but you will see why later. And now proceed to printing!

You would need your phone, Instax SHARE and a pack of film (duh!!!)
Don't forget to download the free app (Instax SHARE) for printing your photos wifi here(iPhone or Android). And more instructions to print the photo can be find here too.


Load your pack of film by following instructions.  


Connect to Instax SHARE printer Wi-Fi. For my iPhone 5, I go to Settings >> Wi-Fi >> and select the printer (if you turn on your printer, it should be listed on you Wi-Fi settings)
Go to your Instax SHARE app >> Choose from Photos >> Select Photo >> Connect and Print.
You can also edit your photo before printing in the app itself - mainly rotating or resizing or add basic filter the photo before printing it out.

And then let the printing begin!


And here's the comparison of the photo that I have printed out. The one of the left have been edited with filter (lights out, increase crispity) and the right was totally no filter. I personally prefer the one on the left because the colour is richer and doesn't look over-exposed.


So now, your turn to try printing from your Instax SHARE! Happy printing!

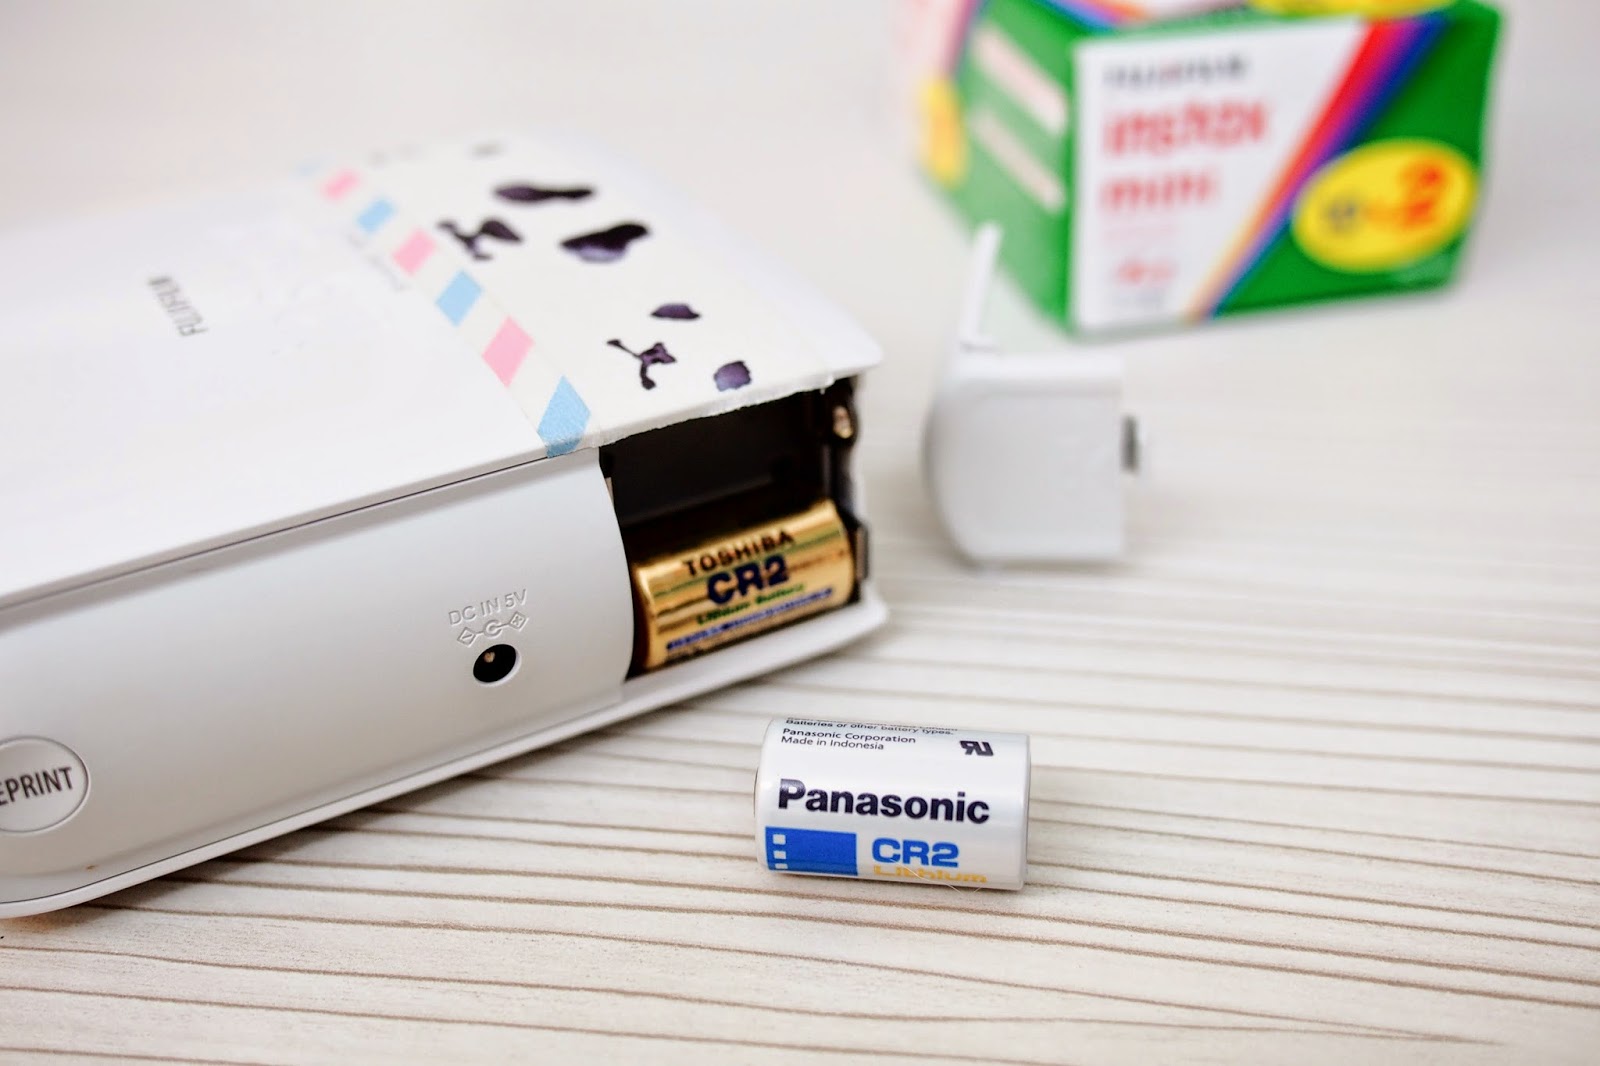
Oh ya, I would like to share how fast my battery actually died on me when I was using it during my Japan trip. The printer actually uses 2 pieces of odd-sized batteries - CR2. It is very difficult to get it at where I am located. I got extra batteries from BIC Camera while I was in Tokyo at USD5 each, still it is not cheap. And I paid USD7-8 for the batteries if I were to get it in Malaysia. 

I managed to print 3 packs of films (total 30 photos) throughout my trip. I have friends told me the battery lasted her more than 30 prints, but well, i guess it depends on how you used it too. I only print 2~3 photos at once  and  I think the switching on and off my printer part made the batteries die even faster. 

So my solution? I got an USB cable (at USD3.80)  to connect to my portable power bank (which I have 3!!) and also a set of rechargeable batteries for CR2 (at USD11.50). I got these from an Online Store named Passion Gadgets which is based in Singapore. I am sure you could get them from Ebay too


I hope you enjoy my step-by-step of printing from my FujiFilm Instax SHARE printer using my iPhone. Have a great weekend!

XoXo,
sam-sig

Tuesday, May 20, 2014

Tutorial⎪Honey, I Shrunk The Stamps! *Evalicious*


Hello there! Some of you may have seen me posted on Instagram about me making those little charms using Shop Evalicious stamp sets and shrink plastics. So today I am going to walk you through my process of making these cute little charms and also ideas on how I use them on my planner and Midori Traveler Notebook.

So to shrink your stamps (no pun intended) you would need these:
1. Shrink plastics (I have them in white and clear, got them from Art Friend Singapore)
2. Stamp Sets (I used this, this and this) and Acrylic block
3. Inks (My favourite is Staz On here, and I will explain further later)
4. Heat Gun / Oven to bake the plastics
5. Scissors
6. Circle Punch
7. Crop-a-dile
8. Paints and Markers


Firstly, if your shrink plastic sheet is smooth, you would sand one of the smooth side so that the texture will hold the ink / colouring. My plastic sheets come with one smooth and one texture side, so I didn't have to sand the plastic sheet at all. 


Punch various sizes of circles using circle punch - I used 1', 1 3/8' and 2' here.


And here are the inks I tried and I like Staz On the best.
P.S. My Staz On is drying up as I have had it 5 years ago, so it doesn't ink well. But thats okay, we can go over it with a sharpie or Zig marker. But this step is rely optional as the ink will turn out darker once shrunk. 

From left to right: Staz On, Ranger Archival Ink, Brilliance, VersaFine, Verscolor and Prima Resist Chalk Edger.


Close-ups of the stamped image before I heat it up: 
Staz On, Versacolor and Prima doesn't bleed  but the rest bleed, especially Ranger Archival Ink (although it doesn't show here)


Punch a small hole using your crop-a-file before heat up the plastics or send them to the oven. You gotta be careful not touching the stamped image else you would have smudge the inks like mine show below.


I placed mine into a baking tin that I got from Daiso and heat it up with heat gun. I seriously couldn't imagine my life without my heat gun. It might look wonky in the process but don't worry, just keep calm and keep heating it up. You can use a tweeter or craft stick to hold the plastic while heating up. Once done, use something to flatten the plastic while it is still warm. I use a glass jar tand it works well in flattening the plastic.


And here's the result.

  • Staz On: It doesn't smear before / after we heat it up.
  • Ranger: It bleed and smear badly, even after we heat set the ink.
  • Brilliance: It smears a little before heating it up. Once heat up, it doesn't smear and it is perfect.
  • VersaFine: It smears a little before heating it up. Once heat up, it doesn't smear and it is perfect.
  • Prima: It doesn't smear before / after we heat it up.
  • Versacolor: It smear badly before and after we heat up the plastic. But after heat up, you can actually clean up the smudges with wet wipes. The colour will not be as vibrant as we normally stamp on paper.


 I re-stamped all the images with thee three inks that smudge / smear/


And here's the end result! I love how tiny this little charm is! It shrunk from 2 inch circle to 3/4 inch circle. 


The stamped image with versacolor looks perfect after we clean it up with wet wipes.


And now, move on to the advanced part: create a water-colour effect / ombre colour effect on your shrink plastic. I use Tim Holtz Distress Stains and Distress Paints. I prefer Distress Paints over Distress Stains as the paint is permanent once its dry on the plastic and doesn't react to water much.

I draw paint stokes using the mediums below and quickly add water to the paint strokes to make the water less opaque. You gotta work quickly s the Distress Paints dry up real fast.


Then wipe away all the excess colours. Do not worry if the paint strokes look really pale here. Once the plastic shrink, it will look more vibrant.


Stamp and cut the image. Remember to punch hole before heat up the plastic. And use 3/16' hole punch (not 1/8') else the hole might turn out too small.


Once shrink, the colour looks more vibrant right?


I spent hours making these and I had so much fun. And now the fun part is add them to my projects!


I added jump rings and handphone straps to make them into keychains / handphone charms.


 I added it on the front of my Midori Traveler Notebook cover.


And also added another set to my Kate Spade Planner zipper.


These tiny cameras look so cute together <3


I also use my Fox stamp from Typo and added jul ring + chain, hang it on my Kate Spade Planner pen loop.


Added a clasp to the plastic and add it to my Swaroski crystal pen. You can also do the same and add it to your bag charm or Thomas Sabo bracelet.


I have fun making these cute little charms / shrink dinks. Hop you enjoy my step by step process too!
Thanks for looking.

Evalicious Product used:

XoXo,
sam-sig