Showing posts with label planner inserts. Show all posts

Monday, October 12, 2015

Project Management ‘Monster Style’

Hi, it is Wan on the blog today, and I will be showing you how I used my fauxdori insert from the October Happiescrappie kit to help me manage my design/creative team projects.

I am not the most organised person in the world, so I find myself scrambling to meet deadlines simply because there are times when I would mix up the dates, etc. I know things have to change and I was trying to work out how I could design a layout to coordinate everything when my Happiescrappie fauxdori planner kit arrived. The moment I laid eyes on the pages of the fauxdori insert, I KNEW that it would be just perfect for my project management in terms of the work I do for the creative/design teams.

This fauxdori insert is slightly different from the other ones I have received so far in that the pages are not all the same, which makes it easy to keep things interesting. It also gives you an opportunity to get super creative with layouts - win-win! After looking through the different pages, I thought the pages would work well in groups of 2 and 3 for my purpose, so that was how I planned my layouts. 

First up in the insert is the set of 2 pages that I have allocated to the month of October. As I needed three sections, I used washi tape to tape a journaling card from a previous month’s kit to one of the pages. I then stamped a heading using a picture icon and the word ‘ideas’ so that I have a place to use as a brain dump for the ideas I have for the month.

I then moved to the opposite page and labelled the little sweet post-it illustrations with stamps for the smaller projects I undertake as part of my creative/designer team work. As these are usually photos, I used a cute Instagram logo followed by a number because I usually have a target number I would like to hit (other than that required), and labelling them that way will keep me straight on where I am up to in that month.
Now that all the stamping for this set of pages had been done, I moved back to the page that I have attached the journaling card to and used stickers to demarcate the three bigger projects I usually have for the two teams before filling in the necessary information. With the due dates as well as the steps required to complete the tasks all written down, it would be so much easier for me to keep on top of things.
With that done, the layout for these 2 pages is complete and I can now easily track where I am in terms of all my creative/designer team projects for the month of October.
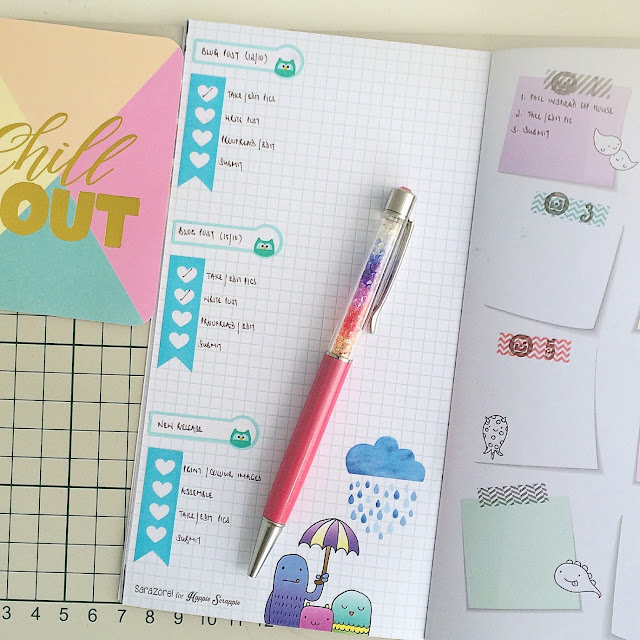
Next up is the layout I designed for the set of 3 pages for the month of November. As one of the pages has a blank space perfect for the brain dump, I did not use a journaling card as for the first set of pages, but just used the same stamps I used for the heading of the journaling card to label the space.
I then used stickers on the opposite page to mark out the three projects just like what I did for the first set of pages.
As for the third page, it has little squares that gives the page a similar feel to the page with the post-it illustrations, so I just went with the flow and used the page in exactly the same way as I have used the post-it illustrations. As you can see from the attached picture, I labelled the squares with the same stamps that I used for the post-it illustrations.
After stamping in the headings for the squares, this set of pages is now all ready to be used for my projects in November. As a side note, although I am currently using this insert for project management in terms of my creative/design team work, I think this kind of layout would work too, with some adaptation (like different headings), for any kind of project management (project life, gardening, paper crafting, etc).

And this is it from me for today. I hope that this post has given you some ideas on how you can use your fauxdori planner kit. Have fun and Happie planning! 

~ Wan

Things that I used in this post
Monster Theme Fauxdori Inserts
Forest Critters Label Stickers
Heart Checklist Stickers

Popsicle Summer Journaling Cards

Tuesday, September 15, 2015

Ideas for using your unpunched inserts / Ideas para usar tus inserts sin agujeros


Buenos días! Aquí María (@maricgbc )de nuevo.
Este mes, mi entrada es distinta a otros meses, he tenido un problema con la oficina de aduanas, así que aún no he recibido mi #happieplannerkit del mes de agosto L.  

Aquí vuestras publicaciones con el hastag https://instagram.com/explore/tags/happieplannerkit/

Good Morning! Here Maria again.
This month, my post is quite different from other months, I have a problem with my customs office, so I have not yet received my august #happieplannerkit .
Here your publications with the hastag
https://instagram.com/explore/tags/happieplannerkit/


La verdad es que los kits son tan completos que tengo material para hacer post durante un año, pero, en lugar de usar uno antiguo, Sam me ha dado la oportunidad de usar los inserts del mes que viene (tema Monstruos) por adelantado! J

Como algunas de vosotras sabréis, si queréis, podéis pedir que éstos os los envíe sin agujeros. Así que si tenéis un Happy planner o un planner de Erin Condren, os van a venir genial!

The truth is the Happie Scrappie planner kits are full of materials or goodies to decorate your planner layouts that you can make into few blog posts, but instead of using the leftover from previous kits, Sam has given me the opportunity to use the inserts of next month (subject Monsters) planner kit in advance!
As some of you may know, if you want, you can request Sam to send you unpunched inserts. So if you are a Happy planner girl or Erin Condren girl, you can use them!


Mi primera intención fue hacer agujeros para poner en mi agenda, pero finalmente dándole vueltas a una idea, se me ocurrió que podía daros otra idea de cómo usarlos. (Explorar nuestra creatividad)

La gente que me conoce sabe que odio ir a hacer la compra, es un trabajo realmente efímero! No es sólo el hecho de ir a la tienda y comprar, tienes que ver qué se ha agotado, apuntarlo, pensar qué menús vas a cocinar y qué productos no tienes en la nevera (o despensa). Hay que ir a la tienda, comprar, llevarlo a casa y colocarlo.
Antes de que te de tiempo a pensarlo, hay que hacerlo de nuevo, no me gusta! Así que cada vez que no me queda más remedio (esto ha potenciado mi creatividad en la cocina) hago la compra más grande que puedo, así espacio las visitas al supermercado.

Pero, como todo en esta vida, si le das un poco de emoción a esta tarea que no te gusta, se puede hacer más llevadera. Por esto mismo, me he creado un “stand” para hacer listas (de la compra) y otras tareas que no me gustan. Por esto mismo, el tema monstruos me ha parecido el ideal para esto, son tareas Terroríficas y Monstruosas para mí, pero ahora al menos son “terrificute” o “cuterrifying”.

My first intention was to punch holes the inserts and then put them on my planner, but at the end, an idea occurred to me. Let me show you how I used them. (Explore your own creativity)

People who know me well, they know that I hate to go to the grocery store, it's kind of dreadful for me to do it. It is not just the fact of going to the store and grab what you want to buy, but before you go to the store, you need to check what food you have finished, take note of it, plan on menu that you are going to cook for the next week and what products you have in the fridge (or pantry room).  Then only you should go to the store, buy, bring it home and put them in the fridge or pantry room.
Obviously all of us have no time to do that again and again - me neither. So every time I have no choice (this has enhanced my creativity in the kitchen), I make the biggest purchase at one go instead of separating my visit to the grocery store into multiple trips.

But like everything in life, if you give a little excitement to the task that you do not like, you can make things more fun and easier. For this reason, I created a "stand" to do lists (of purchase) and other tasks that are dreadful for me to do. For this reason, the monsters theme seemed to be ideal for this. To me, grocery shopping is a terrifying and monstrous task for me, but now it is at least "terrificute" or "cuterrifying".


Para crear el “stand”, sólo te tenido que cortar dos piezas de cartulina, 18 x 9 cm, las he doblado a 16 cm, esos cm restantes los he pegado entre sí.

Luego las he forrado con papel de scrap y he agujereado la parte de arriba para poner unas anillas.

To create the "stand", I had to cut two pieces of cardboard, the length is around 18 x 9 cm. Then I folded the scrap paper to around 16 cm (as shown on the picture), I stuck the two remaining 2 cm from the scrap papers.
I then lined with scrap paper and pierced the top part of the inserts in order to be able to slot some rings.


Con los inserts sin agujeros he hecho lo mismo, los he cortado a la medida y los he agujereado en la parte de arriba.

I have done the same with the unpunched inserts, I adjusted the cutting of inserts to match the size of the stand and I punched on the top part of the inserts.


Además, he pintado la portada, adoro estos pequeños monstruitos! Sarah Zorel hace los doodles más morosos!

In addition, I painted the cover. I love these little monsters! The talented Sarah Zorel illustrated the cutest monsters!


He puesto una hoja de plástico para protegerlo y le he añadido un título “Grrrocery List” He decorado con unas pegatinas de monstruos de un #happieplannerkit anterior y ¡listo! ¿No es sencillo?  Y además, bonito? A mi me encanta! No sé si va a conseguir que ir a hacer la compra me guste, pero al menos embellece mi escritorio.

I put a plastic sheet to protect it and I have added a title "Grrrocery List" I decorated with some stickers of monsters from previous #happieplannerkit and finally it is all done! Isn't it that simple? And so pretty as well. I love it. Indeed this stand provides some motivation to go for grocery shopping and I put this on my desk as a table decoration. 


¿Qué harías tú con tus inserts sin agujeros? Yo tengo alguna otra idea, pero me encantaría conocer las tuyas.

What will you create with your unpunched inserts? I have more ideas, but I'd love to see yours.


Espero que te haya gustado la idea y la pongas en práctica. Además me encantaría verlo! Puedes etiquetarme en instagram (@mariacgbc) o compartir tu propia versión en el grupo de Facebook “Happie Scrappie”, si eres una #plannergirl nos encantaría que te unieses, allí compartimos ideas y muchas cosas más.

I hope you liked it and picked up some inspiration. I also love to see it! You can tag me on instagram (mariacgbc) or share your own version on "HappieScrappie" Facebook group if you are a #plannergirl we'd love you to join, there we share ideas and much more.

XOXO
Maria