Showing posts with label Fauxdori Inserts. Show all posts

Monday, October 12, 2015

Project Management ‘Monster Style’

Hi, it is Wan on the blog today, and I will be showing you how I used my fauxdori insert from the October Happiescrappie kit to help me manage my design/creative team projects.

I am not the most organised person in the world, so I find myself scrambling to meet deadlines simply because there are times when I would mix up the dates, etc. I know things have to change and I was trying to work out how I could design a layout to coordinate everything when my Happiescrappie fauxdori planner kit arrived. The moment I laid eyes on the pages of the fauxdori insert, I KNEW that it would be just perfect for my project management in terms of the work I do for the creative/design teams.

This fauxdori insert is slightly different from the other ones I have received so far in that the pages are not all the same, which makes it easy to keep things interesting. It also gives you an opportunity to get super creative with layouts - win-win! After looking through the different pages, I thought the pages would work well in groups of 2 and 3 for my purpose, so that was how I planned my layouts. 

First up in the insert is the set of 2 pages that I have allocated to the month of October. As I needed three sections, I used washi tape to tape a journaling card from a previous month’s kit to one of the pages. I then stamped a heading using a picture icon and the word ‘ideas’ so that I have a place to use as a brain dump for the ideas I have for the month.

I then moved to the opposite page and labelled the little sweet post-it illustrations with stamps for the smaller projects I undertake as part of my creative/designer team work. As these are usually photos, I used a cute Instagram logo followed by a number because I usually have a target number I would like to hit (other than that required), and labelling them that way will keep me straight on where I am up to in that month.
Now that all the stamping for this set of pages had been done, I moved back to the page that I have attached the journaling card to and used stickers to demarcate the three bigger projects I usually have for the two teams before filling in the necessary information. With the due dates as well as the steps required to complete the tasks all written down, it would be so much easier for me to keep on top of things.
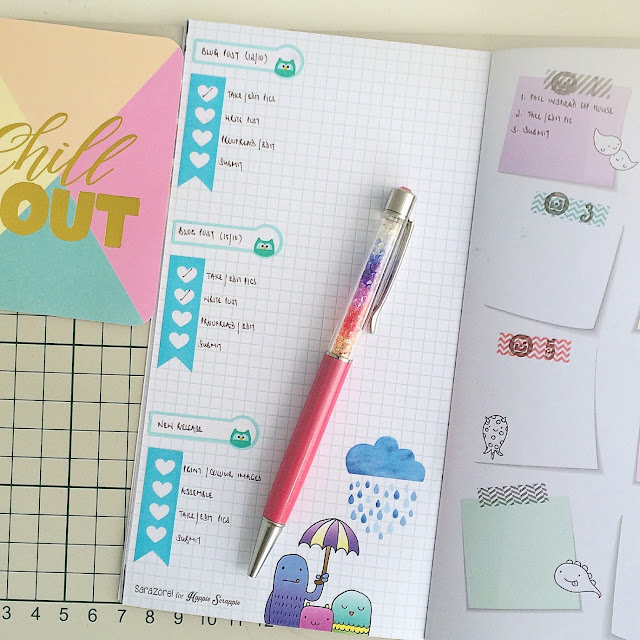
With that done, the layout for these 2 pages is complete and I can now easily track where I am in terms of all my creative/designer team projects for the month of October.
Next up is the layout I designed for the set of 3 pages for the month of November. As one of the pages has a blank space perfect for the brain dump, I did not use a journaling card as for the first set of pages, but just used the same stamps I used for the heading of the journaling card to label the space.
I then used stickers on the opposite page to mark out the three projects just like what I did for the first set of pages.
As for the third page, it has little squares that gives the page a similar feel to the page with the post-it illustrations, so I just went with the flow and used the page in exactly the same way as I have used the post-it illustrations. As you can see from the attached picture, I labelled the squares with the same stamps that I used for the post-it illustrations.
After stamping in the headings for the squares, this set of pages is now all ready to be used for my projects in November. As a side note, although I am currently using this insert for project management in terms of my creative/design team work, I think this kind of layout would work too, with some adaptation (like different headings), for any kind of project management (project life, gardening, paper crafting, etc).

And this is it from me for today. I hope that this post has given you some ideas on how you can use your fauxdori planner kit. Have fun and Happie planning! 

~ Wan

Things that I used in this post
Monster Theme Fauxdori Inserts
Forest Critters Label Stickers
Heart Checklist Stickers

Popsicle Summer Journaling Cards

Friday, October 2, 2015

All About my Little Monster


Hello again!

Today I’m excited to be showing you the completely adorable monster themed Happie Scrappie planner kit! 
If you know me, you know that I’m a fauxdori girl through and through and so I have the fauxdori kit goodies to show you today.

When Sam was designing the kit and I was designing the Limited Edition Confettidori to go along with it, we had no idea what the other was doing and so it was a very happy accident to see that we chose the same design for the interior of the Confettidori and the cover of the fauxdori insert! I love how completely happy and bright this Confetidori is when I open it!
This month Sam designed some acrylic key chain charms to go with the kits and they were a home run success in my opinion! They feel very expensive and well made, nice and heavy and the designs are so completely cute.  And I LOVE that she decided to add a gold chain to them.  Perfection!  Wish I had one of every design!
This kit reminds me so much of the little 2-year-old monster in my life so I decided to dedicate my fauxdori insert to my little monster.
This fauxdori insert is absolutely to die for.  It is full of TONS of different styles of pages; listing pages, and coloring pages, and pages with little sticky notes, and pages with big squares to fill in and lined pages and grid pages.  Some of the pages are in color and some are in black and white.  I’m completely obsessed.
 
With so many different styles of pages it makes it easy to add a bit of your own flair and end up with a beautiful page you can be proud of. 
Sometimes when you have a fauxdori insert and all the pages are the same, it can be hard to come up with the creative spark to fill them all, but this insert with all of its random pages makes it so super easy to feel inspired!
I added a sheet from the little undated calendar notepad that came with the kit to track my water intake.  Since this insert will be more for my little monster, I may change that calendar out for one that tracks my daily journaling about him.
Another page in this insert I used for tracking some of the cute things that Wyatt has been saying and doing lately.  He is changing all the time; so I love that I can easily have a place to jot these little things down to help me remember how cute he was at this age! 
 
Thanks so much for reading this post!  I hope you feel inspired to pull out all of the cute bits from the kit and have some fun!! 

I’d love to see what you do with your insert!  Feel free to tag me if you post any pictures of what you create!

Till next time and with lots of love,
Teddi Confetti

Things that I used in this blog post.

Thursday, September 17, 2015

September Setup with Happie Scrappie Planner Kit


Hi it’s Mits! I missed you last month, so I’m back here to say a quick hello and to show you how I’m using my goodies.  

If you follow me on Youtube, you may have already seen the video unboxing of the awesome Happie Scrappie August Planner Kit, but I wanted to write a short accompanying post as well. (The video link is posted at the end)


Who says washi tape is only for decorating borders and straight lines? I decided to cut out the stars and use them as stickers to decorate the blank dates in my monthly calendar.  The colours are soft enough and the stars are small enough that it adds just the perfect touch to a blank calendar page.


The next thing I used were the page flags. What’s awesome about these page flags are the fact that they’re transparent. If you know me, I love transparent sticky notes.  I used this page flag to highlight one of my monthly goals.  (I know..it says “monthly debrief”, but I use it to set my goals hehe)


Next are these super pretty journaling cards. I absolutely love them.  I think Sarah and Sam did a wonderful job with these!  


If you are new to the planner world, you may wonder how you could incorporate these into your planner.  You could stick them in your planner as decoration, but I like to use them for my to-do list as well.  Because these pretty journaling cards are double sided, I decided to tip it into my planner with some washi tape and use the backside for my to-do list.   


… and yes, that’s right. You see a super cute September calendar printable.  If you aren’t a part of the Happie Scrappie Facebook group, don’t forget to join.  Not only will you get tons of inspiration from fellow planner addicts, but you can get these super adorable printables for FREE! 


I’m having so much fun with this makeup theme, but I’m really looking forward to this month’s monster theme as well.  How are you enjoying your Happie Scrappie goodies? Don’t forget to hop onto the FB group and share your ideas J 


Things I used in this post.

Happie Scrappie August Kit
Travel Notebook - Popsicle Theme


Cloud and Dew Drops Stickers


Thursday, September 10, 2015

Organising the New Home


Hello there! It is Wan back on the blog. Today, I am going to show you how I use August’s fauxdori insert to help keep me organised on recurring home tasks.

I know I have been labouring this point to death, but we have just moved. In the course of decluttering and getting ready for the move, I discovered that I have really let certain things lapsed (like having all sorts of expired food sitting around – totally yucky! – and letting little E’s stuff get totally out of hand – hmmmmm….why is her 2 year old clothes still sitting around in the closet?), so I am determined to be better in our new place. I have been thinking about how I can sort out a system when my August Happiescrappie fauxdori kit arrived, and I figured that the blank insert would be perfect for the job (plus who wouldn’t like being cheered up by all the gorgeous makeup doodles while doing mundane household tasks?). So, shall we get started on how I went about creating my own home organisation insert?

I knew I wanted a title for each page, and 2 columns (one for the date I carry out the task and the other for any notes I might want to make), so I used panda tab stickers from a previous Happie Scrappie kit to mark the title and slim washi tape to make out my columns (as pictured below). 


Then, so that I can have an easy way of identifying tasks recurring at different intervals (monthly, 3 monthly and 6 monthly), I taped a small piece of washi around the edge of the page. 


I used different colours for tasks of different intervals – yellow for monthly, aqua for 3 monthly and pink for 6 monthly), and the picture below shows what it looks like when all the pages have been done. Some pages do not have washi tape on as I left some pages blank in between the different intervals, just in case I have other tasks to add in later. 


As you can see, this makes it easier to find the relevant pages.

To keep things even more coordinated, I also made sure that the colour of the panda tab sticker on any particular page coordinated with the colour of the washi (in fact, that was how I chose the three colours of the washi tape, because the panda tab stickers came in those colours).


Being quite a visual person, such colour coding works particularly well for me.

With the layout of each individual page completed, I then stamped the words “Date” and “Notes” in each of the two columns on all the pages I needed. This is so that I can easily see when the task is last done, and also any notes/reminders for the next time I do the same task (for example, chemical cleaning needed at next air-con servicing). 


After doing that, all there was to do to complete each page was to write in the relevant task on the panda tab sticker.


Once all the pages were done, I wrote an index list of all the tasks, separated by their colour codes, and taped it to the front of the insert (this colour coding system works brilliantly using the stickers that come with the kit because the stickers tend to come in matching colours every month). 


I then used the same dot stickers of the relevant colour to mark the dates that the tasks are to be done in a spare monthly fauxdori insert that I have and I did this for the upcoming six months. 


Now that I have all my recurring tasks scheduled for the next few months, I will be making sure I do not forget about this system by keeping both these inserts together with my daily planner. Seeing that this system will only work if I use it, I plan to refer to the monthly insert at the beginning of every month to check for any upcoming scheduled tasks. 

So there you have it, my own version of a home organisation tool. I hope the post has given you a few ideas to play with and if you do customise your Happie Scrappie fauxdori insert, do tag us on IG or post in our Facebook group, because we would love to have a peek! Have a great day and Happie planning!

Wan

Things that I used in this post. 


Happie Scrappie Notepad
Panda Tab Stickers
Round Dots Stickers
Skinny Washi Tape

Thursday, August 6, 2015

Happie Planning/Tracking Exercise And Meals

Hello, everyone! It is Wan (aka wansplansandexplorations on IG) back again. In today’s post, I am going to show you how I use July’s fauxdori planner kit to plan/track my exercise and meals (as well as some household shopping). 

As I have mentioned in my last post, I am gearing up for a house move. I know, from previous experience, that I tend to neglect my health when I am busy. Hence, I decided to start an insert to keep track of and plan my exercise as well as my meals. This month’s fauxdori insert in the planner kit was perfect because it was blank, which meant that I could customise it completely to suit my needs.

First, I laid down stickers included in the kit to mark the seven days of the week.  I wanted to keep the entire week on one page, so I divided the page into two with thin washi and laid the stickers such that Monday to Saturday were in one column, and Sunday was in the second column, next to Saturday. I chose this layout as I did not need as much space on the weekends. This is because I don’t usually engage in any specific exercise during the weekends (being family time and all), so I just needed space to track/plan my meals and my Fitbit steps. 


Once the stickers were laid down, I stamped in the days of the week using the set “Brush Dates” from Studiol2e.


Now that I have divided the page into various days, it was time to start stamping in what I have planned for and/or wanted to track each day. I started by stamping in “lunch” and “dinner” in the second column (both words are from “Plan to Eat” from Sweet Stamp Shop). I did not include “breakfast” because breakfast is essentially a green smoothie every day, and with it being unchanging, I didn’t think it was worth tracking or planning for.


I then moved to the first column and used stamps from Plan Fitness (Sweet Stamp Shop) to stamp in the exercise I have planned for the day, as well as a sneaker shoe to track my Fitbit steps.


Once that was done, this page was complete. This is really all I want to plan for/track in terms of exercise and meals for the week, as I usually do the rest of my meal planning in my Paprika App on my iPhone. Based on the meals I have planned for the week, I use the app to compile a list of groceries I need to buy, so I don’t usually write those down. However, I have found that as I go through the week, I would find bits and pieces that I would need around the house, so I decided to use the opposite page as a landing page for these odds and ends that, usually, would not end up on the list in my app (items such as toilet paper and toothpaste, i.e. essentially anything that is not food related). I stamped a grocery cart and the words “Don’t forget” (both from the set “Daily Kawaii” from Mommylhey) on a notepad page from a previous month’s planner kit and then taped the page down with washi tape on the opposite page. 


This system works for me as I always double check what meals I have planned before leaving for the grocery store to make sure that the grocery list in my app is correct and complete. If there is anything on the notepad, I just grab it too, and take it along. 

This is it from me for today. As you can see from this last picture, the two pages I have customised allow me to easily plan/track my exercise and meals (and coordinate the shopping while I am at it!).


I hope this has given you some ideas on what you can do with your Happiescrappie planner kit. Please do tag us when you post your ideas on IG as we would love to have a peek. And finally, happie planning!


Wan

Products that I used in this post.


Happie Scrappie Travel Notebook
Happie Scrappie Notepad
Washi Tapes


Binder Clips