
Hello everyone, it’s Lucy (@organisedlucy) again on the blog. I
cannot wait to share with everyone how I used the goodies from the August
Happie Scrappie Planner kit to set up my planner.
The August Happie Scrappie Planner Kit is
my absolute favorite among all the Happie Scrappie Planner Kits that I received
previously, as I always have interest in the beauty department even before I started my obsession over papers and stationeries. The August planner kit is definitely jam-packed with so many gorgeous goodies that you can easily
personalize and use on your planners. Furthermore, this month’s planner kit is a
collaboration between Sam and Sarah Zorel (@sarazorel).
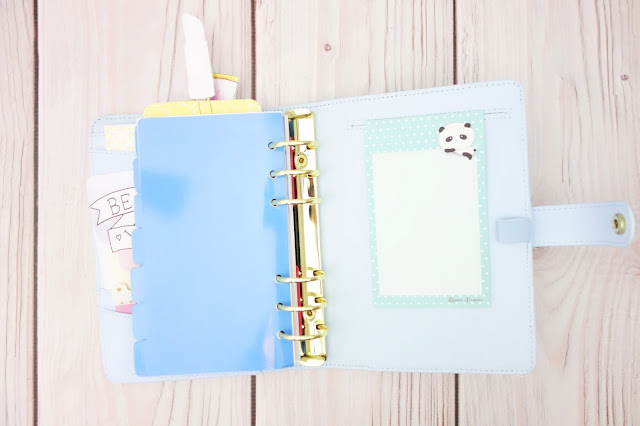
Recently I succumbed myself to the
temptation of buying the new Kikki K planner- Icy Blue Perforated Medium Size
Planner. It is just too gorgeous. I am sure everyone has seen this planner on
instagram, youtube, blogs and Kikki K Website. So when I received my Happie Scrappie
Planner kit, I knew right away that I wanted to do a planner setup with Happie
Scrappie goodies.
The August Happie Scrappie Planner kit
comes with a double sided dashboard, a double sided page marker, twelve pieces
of double sided journaling cards, four different designs of planner inserts, a
roll of washi tape, one sheet of makeup theme deco stickers, transparent page
flags, a pack of sticky notes, a pen, a charm and two Kate Spade paper clips.

Let’s take a look at the Dashboard. It was
printed double sided with two different designs on it. Since I love both
designs of the dashboard, I decided to use a Post-It Index Tabs to act as a
base to hold the dashboard and the pagemarker and punched holes on the tabs
instead of punching holes directly on the dashboard. This is to ensure I will
still be able to use the other side of the dashboard. The Index Tabs can be
found in most stationery stores. You can apply the same method for the page marker
too, as it was printed double sided with two different designs.
I then picked up one of the planner inserts and placed them on top of the dashboard with index tabs adhered on it. The purpose of this was just to ensure the spacing of the holes punched would fit perfectly into the planner's rings. I used the single hole puncher that I got from Kikki K recently. Although the size is rather small, it is in fact very sturdy and I managed to punch holes through the laminated
dashboard.


Next I like to put page flags and sticky notes in my planner pocket, as these stationeries are very functional to me. I normally use them to mark my calendar and my weekly layout.

Then I moved on to select the journaling
cards that I want to put in the planner. I was having a hard time during the
selection process. The watercolor painted by Sam really complemented the
illustration drawn by Sarah so much that I just could not take my eyes off the
journaling cards. They are just too captivating! At the end I decided to pick
the one with the banner on it that has the words “BE YOU TIFUL”. Instead of the usual display of the journaling card in a planner, I decided to add a cut out image from one of the journaling cards and clipped it to the
other journaling card.


Of course this setup would not be complete
without a collection of washi tapes. They come in handy when I need to stick a
notepad on the inserts or just for decorative purposes. I picked up an old
business card and used it as the washi tapes holder.


I also added my favorite stickers from Happie Scrappie
such as the small dots, the happy mails & the fox critters stickers and the makeup stickers from June, July and August planner kits respectively into the largest pocket in the planner.

Since I purchased extra sets of the journaling cards (I may
need more now), I decided to create DIY paper clips using some of the images
from the journaling cards.
Things that you will need to create the DIY paper clips are a piece of cardstock, paper clips, journaling cards, a pair of scissors, beacon glue, a laminator and a laminating pouch.
Things that you will need to create the DIY paper clips are a piece of cardstock, paper clips, journaling cards, a pair of scissors, beacon glue, a laminator and a laminating pouch.


I started with cutting the images that I wanted from
the journaling cards. Then I made a copy of the similar shape on the cardstock and cut them (this is to make sure I have sturdy paperclips). Next, I put them into the laminating sheet and ran it through the laminator. Finally I cut the laminated
images and glued them to the paper clips using the beacon glue.
The processes are quite simple. You can find a youtube video by Lisa Pullano on how to do a DIY paperclips or you can find the tutorial on Sam's blog - link below.
http://happie-scrappie.blogspot.sg/2015/04/planners-from-scrapbooking-goodies-to.html
The processes are quite simple. You can find a youtube video by Lisa Pullano on how to do a DIY paperclips or you can find the tutorial on Sam's blog - link below.
http://happie-scrappie.blogspot.sg/2015/04/planners-from-scrapbooking-goodies-to.html


Lastly I added the Happie Scrappie Notepad to the back of the planner.
That’s about it! Now I have a newly setup planner with Happie Scrappie
Goodies in it.

I hope you got an useful tip or two from this entry on how to use
the Happie Scrappie Goodies.
See
you next time.
Happie Planning everyone!
FYI Happie Scrappie has its own Facebook Group now, do join the fun - link below :)
https://www.facebook.com/groups/439566509577989/
FYI Happie Scrappie has its own Facebook Group now, do join the fun - link below :)
https://www.facebook.com/groups/439566509577989/
XOXO
Lucy
Things I used in this post.
 |
| Personal Size Planner Kit - Aug 2015 |
 |
| Forest Critters and Mail Stickers |
 |
| Panda Notepad |
 |
| Tiny Dots Stickers |
Cuteness overload =]
ReplyDeleteemyii90.blogspot.co.uk
The set up is beautiful! I love what you did with your extra set of PL cards. You can never have enough paper clips! Love this, Lucy!
ReplyDeleteChinkyyy... Muacks... Yes we will never have enough paper clipsss. Thank youu.. LOL im too excited to see your comment I guess haha
Delete