Showing posts with label Instagram. Show all posts

Sunday, May 18, 2014

Layout⎪Using My Favourite Supplies + Giveaway *Made With Love*

Hello there, it's been busy (but in a good way) in May. I am pretty amazed with how much I have created and how many blog post I have published this month given my crazy schedule. Time is always not enough nowadays and I have decided to cut down my design team works so that I could spend more time with Ivan. I really want to enjoy his toddlerhood more + I do not want to turn scrapping into a chore for me. 

Today I am back with a layout that I made for Made With Love, with a simple challenge. Firstly, I would like to show you 3 of my favourite things whenever I create. Okay, three seems too little and I am sure I have like hundreds of favourite things, or maybe everything from scrapbook store. After spending  hours picking my supplies, I narrow down my list to these three:
1. Puffy stickers! the puffier the better ;P and also enamel dots
2. Vellum Die Cuts
3. Distress Paints

Okay okay, I know there are four here, but I just want to group puffy stickers and enamel dots together.


And here's what I created with the supplies mentioned above, heavily inspired by Wilna's recent video. I wanted to have colour paints over the black patterned paper from Amy Tangerine which is totally opposite from what Wilna made in her video.

I started typing the quote on my Silhouette Studio using the font CoCoGoose and arrange the alignment and cut it on a piece of smooth white card stock. Paint the rainbow colour using Distress Paints and layer it over a piece of black patterned paper from May Tangerine PlusOne collection. I love that distress paints are thick and vibrant, and it doesn't make the paper buckle at all. 


Once I am done, I printed really small photos (3 photo in a piece of 4x6 photo paper) and lay it above the title. Added some vellum die cuts, enamel dots, puffy stickers and die cut that I made with eBosser + Cas-ual Friday dies then I am good to go.


During busy days, I really love how a quick + simple layout turn out to be.

And now more details about the challenge + giveaway:
1. Take a photo of your project (be it old or new layout) using one of the favourite supplies that I have mentioned above.
2. Post it on Instagram and hashtag #mwldtchallenge @madewithlovesg
3. You Instagram profile has to be public + you must be living in Singapore.
4. A winner will be pick from all the IG entries on 26 May 2014.

Have fun and all the best!

XoXo,
sam-sig

Wednesday, May 14, 2014

Tutorial⎪Stitch Your Stamps *Evalicious*


Hello there! today I have shared a simple project with a simple step-by-step tutorial on how to use your stamp as stitching template at Shop Evalicious blog. And guess what? Stitching on paper is very therapeutic and way easier than stitching on fabric. So have fun and enjoy the mini tutorial!


And these are the two Moleskin Cahier that I stitched the cover with and I always use these mini notebooks as my travelogue.


In this tutorial, I use Moleskin Cahier which I love its size, just the right size to doodle and small enough to slip into any of my handbag.


I used the little Instagram camera from Evalicious Oh Snap! Clear Stamp Set  on the cover. You can use any stamp set that you like.


You will need very basic supplies to stitch you cover:
1. Paper pierces (or any sharp needle) preferably with a piercing mat
2. Embroidery floss
3. Stamps
4. Inks ( you can use VersaMark or any light colour ink, do not use dark colour ink as it might peek through your stitches)
5. Scissors


Start stamping with Versamark on your book cover and pierce holes along the line. 


I use 3 strands of embroidery floss for my Instagram camera and 6 strands for the word 'smile'. Stitching the word 'smile' does require quite a bit of patience because I pierce the holes very near. These are sew using back stitch which you can check out the video tutorial here


And here's how it looks like once you are done stitching.


Do not worry if the back part doesn't look pretty. I use washi tapes to secure the ends and knots. And cover it up with Hello 2014 SnipSnip Large Tags.


Then I added some tabs to the book by using Snip Snip Labels. All you need to do is cut out the Snip Snip Labels, fold it into half and attach it to the edge of the pages using tiny attacher / tape glue. 


 And here I am showing you some of the pages from my Ampersand notebook that I used as my Japan travelogue in April. I printed the map on photo paper and add  it to my book.


Thanks for looking! I hope this post inspire you to use your stamp sets in a fun & creative way! 

Evalicious Product used:
Xoxo,
sam-sig


Wednesday, February 20, 2013

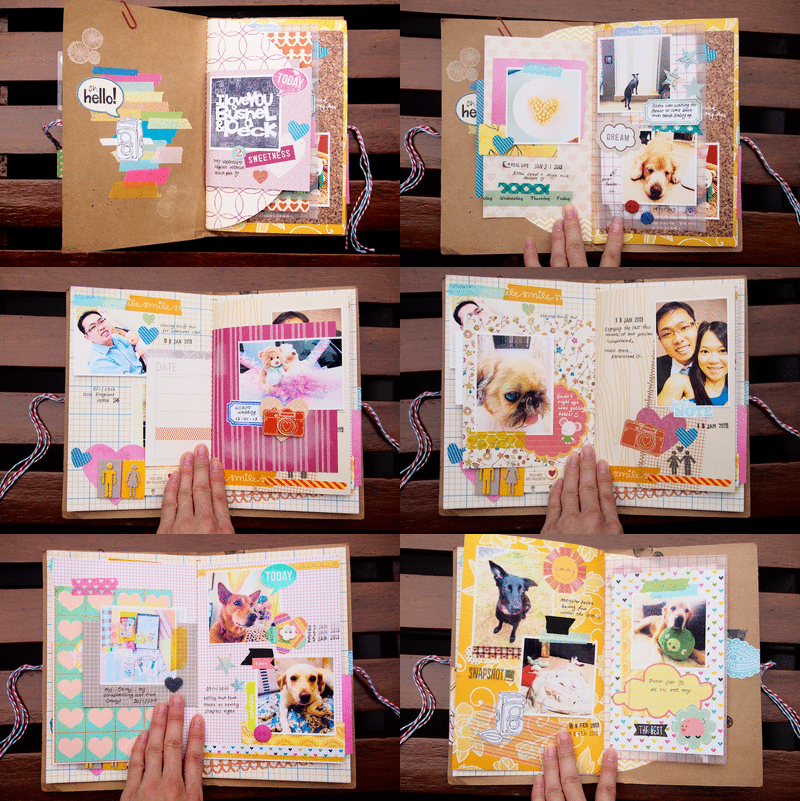
Amy Tangerine Daybook - InstaLove

I am addicted to Instagram for the past two months or ever since I have gotten my iPhone 5. Browsing my Instagram feed before I go to bed and also first thing in the morning is somehow part of my daily routine now. I am so glad to know a few IG friends which are located in Singapore, Malaysia and also Brunei. Most of them are project lifers, scrappers and also crafters. And I am so grateful that I even have 560 followers on my IG now. >_< The numbers of followers grows tremendously (as in double) in the past 2 months! Oh by the way, you can click here to follow me on Instagram.

I saw one of the Daybook by Evelyn on my IG feed and was so inspired to use up the daybooks that I have been hoarding for over a year. I like how random those pages are yet the colors are coordinated perfectly. It's just like another mini Smash book with fewer pages. So I just printed some of the Instagram photos that I took in Jan / Feb this year and glue it down to my daybook. I completed the book under 2~3 hours then I just added some journalling and date stamp according to my IG feed. 

I added twines to tie the daybook so that it could close well. I just use whatever thickers and embellishment that I could find on my scrap desk. This Daybook is from Amy Tangerine very first collection that I have been hoarding and didn't know what to do with it. I started with the cover and title then I just glue down all the photos randomly (without any chronogically order).


Gentle reminder: There are over 20 photos for this blog post. ;) I wonder if you could read through the whole blog post. LoL.

Washi tapes are necessities.... I super love those solid colors MT. Great for layering and adding textures to any project. 

Some of the crafty projects I did in January


Dogs appear very frequent in my IG feed too.

 
Getting ready for Chinese New Year 

Okay I cheated. The photo on the right is not on my IG feed. But I just love it so much and decided to add it to my daybook. 


Super in love with this piece of Sassafras heart paper! I have been save up every bits of this paper to find the perfect layout / project for it.

More doggie photos. Why? Because I have a total of 10 dogs in Kuala Lumpur & Singapore. Yea, you read it right, TEN dogs!

Food porn =P The daybook has gotten so thick that I couldn't stamp properly. 

This picture is very meaningful =) It reads: 15 months into scrapping, I have completed 89 layouts, 15 mini albums (included those I have given away), 5 altered projects, 3 Project Life spreads and 2 Smash Book + a tonnes of cards. Okok, I cheated again. I only completed 1 1/2 smash book (completed the Red one and the Black is half way done). 

 The photo on the right showed the RAK / Giveaway that I won in January! 


Just added some random bits of washi tapes here n there.

Oh I am glad if you are still reading this post. Here's the back cover of my Daybook. 

Thanks for looking, XoXo!