Showing posts with label Tips n Tricks. Show all posts

Tuesday, January 27, 2015

Planners | Page Marker To Hold Your Washi Samplers


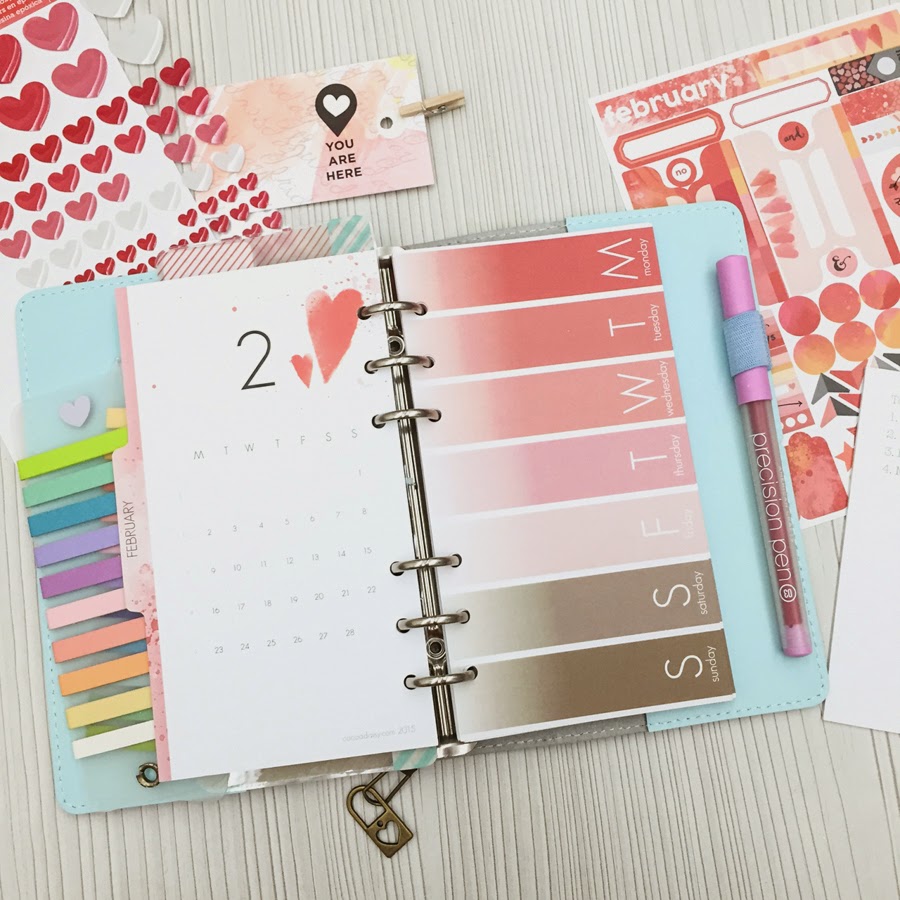
 Hello everyone! I am sooooooo in love with Cocoa Daisy Day Planner February kit! There are so many little hearts sprinkle all over the the page inserts and embellishments. Before I show you how I make retractable washi samples page marker (with a short video tutorial), I would like to show you more pictures of the Daisy Day Planner kit. How can you not love them? It is full of hearts and pinks / reds - my favourite colours.


Close up of the page marker - using the cute envelope stamp and also cute heart-lock charm.


As usual, I love the quotes on the monthly page - and especially when it is in cute calligraphy <3


The Week-on-one-page for the february kit.


 And my favourite week-on-two-page which I can't get enough of. I am using this inserts to journal my daily and I can't wait to show you more of these.

And here's a simple video tutorial on how I make a page marker - to store my washi sampler. I hope you like it!


Thanks for dropping by today and have an awesome day ahead!

This video shows you how I combine my love for a planner page marker and washi tapes sampler. I dream up the concept of this page marker (literally dream of how to making this when my 20-month-old kick me in his sleep) - inspired by the old-school  retractable / folding ruler that my dad use when I was really young. 

All you need is washi tapes roll on a piece of transparency / acetate sheet, cropadile and a page marker to make this. Remember to roll the washi tapes sample on your acetate sheets first before fixing it onto the page marker.

Related blog post: 

What I used: 
Washi Tapes: MT Slim 20
Stamps: Cocoa Daisy
Inks: Versafine Onyx Black
Camera (for Video): iPhone 6

XoXo,
Sam

Saturday, December 27, 2014

Planner | How To Make Page Marker for Your Planner

Hello all! Happy holidays and happy weekend =) Today I am showing you some of the page markers that I made for my planners. Most of my planners have their own set of dividers and page markers. I don't use them all at once but I would like to swap the dividers and page markers depends of my mood and season. Most of these page markers are either made of scrapbook pages, stamp image or I draw the image myself.


Some of you may ask, what is page marker? For most of the 6-rings binder users (be it Filofax, Kikki K, Kate Spade agenda etc) they always come with a ruler-like book mark. This is to serve as bookmarking purpose, to let you quickly flip to the page when you are using for that day/that week. The planners normally come with a transparent piece of plastic ruler with 6 hole-punched. But so personalized our own planner, a lot of planner nerds like to customized their dividers and page marker with a theme. See how the ice cream & TODAY page marker is longer than the usual pages and make looking for particular page so much easier?


Making your own customized page marker is easy and fun, and it wouldn't take you more than 15 minutes to make one. It is as simple as making cards, just that you would need to send it to a hot laminator to laminate it & make it sturdier.


To make your own page marker / dividers, you will need the following:
1. Original dividers from your planner / Daisy Day Planner monthly divider to use as guide for sizing and holes
2. a piece of scrapbook paper or cardstock of your choice (I painted a piece of white cardstock with Distress Paint and trim it down)
3. Jubilee sticky notes that come with your December Cocoa Day Planner kit (Optional)
4. Die Cut/ Stickers / Letter Stickers to decorate your page marker (make sure they are relatively thin / flat, not puffy stickers or foam stickers else you will not be able to laminate it)
5. Scissors & Hole Punch (I am just using a single hole punch that you can get it from any office supply store)
6. Hot Laminator (If you do not have laminator machine, you can send it to office supplies store to get them laminate for your or you learn how to laminate with an iron by watching this video.


Firstly, I am using my A5 sized Daisy Day Planner December divider as a guide for the size of the page marker. I eyeballed the width of the pagemarker marker to be around 3 inches and the height to be approximately an inch taller than the December divider so It will peek out from the top tab when it is done.


Then I added the Sticky memo with calendar and Today from the December kit + HELLO tab using stickers from one of older Amy Tangerine collection. I added more adhesive to the back of the sticky notes so that they won't move when I send the page marker for lamination. I also stamp some sentiments using the cute stamps that come with December kit. the coffee cup is just too too cute! I decided to make one more matching page marker in Personal sized since I have left over paper.


I then punch 6 holes by using the December divider as guide and also added reinforcement rings to make it look cuter. I actually color the white reinforcement rings with copic markers and now they have rainbow colors. I also like to round the corner of my page marker else the edges might be too sharp after it being laminated.


And this is how my page markers look like once I laminated them. I re-punched the 6 holes again and cut little slits next to the punched holes. This would make slotting in and out of the page marker much easier, without opening the rings. Okay, now move on to how to make your page marker more than a book mark? You can use it as a to-do list / reminder than it will pop up whenever you open your planner. Since I have calendar and to-do list on the page marker, then you would ask, what are the pens to use / write on laminated plastic?

You have 2 options here:
1. Use dry erase / whiteboard markers
2. Use Permanent markers


Now let's look at Option 1: Dry Erase / white board markers that I learn this tips from Donna (Instagram: @umbooba). I got these markers from Daiso and they work perfectly. The black one even comes with a felt roller that serve as the eraser to erase the markers from the plastic / whiteboard. However....


I do not like how thick the marker pens nib are. And I also do not like how easily the writing being rubbed off when I was using the page marker and the writings sometimes transfer to the page next to it.


But the invention of the felt roller cap is just brilliant. I don't use these dry erase markers on my page markers but I do use them to draw on a whiteboard notebook (from Daiso) to keep my 20 month old entertained when we are out and about. Love that the colorful markers are of finer nibs.


And now let's move on to Option 2: Permananet Markers (like sharpie, American Crafts Slick Writer, Pilot Twin Marker & Pilot Multiball) + Erasing tools: Alcohol swab & Eraser (I kid you not!) I will post a link where you can get those pens later.


Here's the pen swatch that I write with the above for permanent markers. I like love those with Ultra fine nib as I have small hand writings.
1. Pilot Multiball in Fine and Medium nib. These are my favourite as they write with gel-pen like tip (not felt tip like the usual markers) and the nib is really really fine too. Plus sometimes I forgot to switch my pen to write on normal planner pages, these pens don't bleed through the pages! Which is super awesome as I can use them to write on any surface! You can get them here in different nib and colors. You can check on the link for photos that show you they don't bleed thru the pages.
2. Sharpie. I like the double ended Sharpie as they comes in ultra fine nib and a lot of colors! They are so inexpensive and easily accessible in any book stores / stationery shops. Get them here.
3. Pilot Twin Marker. Or some call them as the Washi Pens/ Markers. I love using them on the laminated plastics, writing on mailer bags or washi tapes for labeling. There are inexpensive and last a long time. You can get them here.
4. American Slick Writer. These pens are waterproof, fade proof, acid-free and comes in so many colors! I found a link on Amazon where you can different colors here. I love that the Amy Tangerine Yes, Please collection slick writer comes with fun & vibrant colors!

Then now the question is, since they are permanent markers, how do you clean them off the page markers?


And the answer is.... good ol' earsers! I actually learn this trick from a girl on Instagram (IG name: @jenkneelinderz). The not-so-stubborn / felt tip markers can be erased with eraser effortlessly, well almost effortlessly. And the Pilot Multiball writings can be erased with eraser too, but you need to use a little more effort & strength *LoL*


The next method is to use alcohol swab to remove everything and wipe the surface clean again with paper towel / tissue paper. The Pilot Multiball inks can be removed with alcohol swap effortlessly.


And what I normally do is: I clean the writings with alcohol swabs first and clean any traces with eraser! And now I have a brand new page marker as my to-do list. So now, you might ask, which pens/ markers is my favourite for writing on plastic dividers?

Another tips I have learnt when I was young - when we accidentally write on the whiteboard using permanent markers - we use dry-earse markers / whiteboard markers to write over it and erase them again. This is so simple but it might leave some grey tint ink on the plastic dividers. So I wont recommend using this method unless you are out an about without alcohol swab or eraser.


I would love to use the Pilot Twin Markers (Ultra Fine nib) to write my to do list as it can be erased easily with eraser. And the dates on calendar or something that I plan to keep the writing a little longer (do not have to be erased daily), I would use Pilot Multiball.


I seriously hope you enjoy reading my tips & tricks in this post + try your hands on making your own dividers / page markers. It is so fun to customize / personalize your own planner(s) according to your need and preference. And my next post is about pen test on Cocoa Daisy Day Planner pages / paper! Do leave a comment down below what is your beloved pens / pens that you would like me to test out, and I will try to find them in my book store. It is so fun to experiment with new stationeries!

XoXo,
Sam

Friday, August 9, 2013

Blog Hop⎪Citrus Twist Kits + Tips & Tricks

Welcome to the Citrus Twist Kits Celebration Blog Hop!! We have some fun celebration inspiration for you and of course, what's a blog hop without awesome prizes!  This hop is in celebration of our new website.  We would love for you come check it out HERE

We also want to remind you the August kits will be revealed on August 12th! Citrus Twist has an amazing special going on right now for new subscribers: purchase a 3-month or longer subscription (PL or Main Kit) and get a free goodie bag of embellishments ($20 value).  And if that's not enough of a perk, we also want to remind you that once you have subscribed for 12 months, your 13th kit is FREE (you just pay shipping on the free kit).

Now for the Prizes: Two lucky commenters who hop to ALL 10 design team blogs will be entered to win one of two $10 gift certificates (GC) to the Citrus Twist Store.You just need to leave a comment on EVERY designer's blog to be entered to win. We would love to hear about something you are celebrating or you can leave us some love. After visiting all 10 DT blogs, come back to the main Blog Hop blog post and comment that you visited each blog and and your name will be entered into our contest. Comments end Monday August 12th. Winners will be announced on the main Citrus Twist Kits blog by Friday August 16th.

Let's get started:
Amelie Mordret
Angie Gutshall 
April Joy Hill
Gina Rodgers 
Jen Boumis
Kasia Tomaszewska
Melissa Stinson
Nina Ostermann
Sandy Ang
Waisam Ho        <<— I'm here!
Citrus Twist Kits  <<— Stop here next!

Here is my celebration layout I created using Simple Stories paper & Echo Park Element Stickers from August kits (Pattern Paper Add-on & Add-on Embellies). I took this photo of my boy's chubby feet on his 4th month birthday. Yea, I know 4th month birthday is weird but my father in-law insisted to throw a party for him when he is 120 days old. I was told it is part of chinese-hokkien culture to celebrate baby's 4th month old (that I have never heard of LOL). And stay tuned! I have a mini tutorial to show you how I altered the background of this layout. 

p.s. I just love this pair of cute little feet that rock my world.

I was going a little mixed media and keep-it-simple for this particular layout. Loving how it turned out and this is my favorite layout by far! Okay, I know I have been saying this every time I created a new layout. >_< And I am digging' blue/teal color at the moment. Maybe my boy has converted me from pink/peach color lover to a blue/teal color lover.

Precious-12

Close-up of the layout : I created a little banner pennant with the flags & banner from the sticker sheet. And I used Tim Holtz distress paint to tone down the color a little. Same goes for the blue chipboard letters - I brush only the bottom of the letter to create an ombre effect for the title.


Precious-13

Layering some of the stickers. I made the sticker less sticky (or remove the adhesive) with some baby powder and glue them down with liquid glue. 


Precious-14

Supplies that you need for altering / creating this mixed media background:
  • Gelatos® (Add them to you cart at Citrus Twist store and ship free with your kits!)
  • Acrylic Paints (I used Martha Stewart here)
  • Tim Holtz Distress Paint in Picket Fence
  • Water color brush
Precious-2

I doddle circle of various blue / teal shade on my paper. Do not dilute with water, you need really thick consistency so that the painted circles will resist the Gelatos® later on.


Precious-3

Once the acrylic paint is dry (make sure the paint dry thoroughly) then start doodle some lines on the paper. I use yellow, blue and teal here.


Precious-5

Then use a wet water color brush to blend the Gelatos®. Add more Gelatos® if you want to. The blue & teal are the metallic color from the Gelatos® gift set.


Precious-7

And here's the fun part that I have been dying to share with you! Easy-peasy way to create water color background in a non messy way.
1. You need a piece of plastic packaging, water brush and Gelatos® (or even mist) of your choice
2. Use Gelatos® to doodle on the plastic packaging
3. Add water
4. Slap the packaging onto the paper. (repeat again for as many times as you like to) 
5. Use Tim Holtz Distress Paint in Picket Fence (white) to tone down the colors that are too bright, (step not shown here)
Mind you, this is really addictive!


PRecious Tutorial


Alright, that's my mini tutorial for creating a mixed media effect layout. Do try the technique out and link me up if you created a project with this. You could tag me on Instagram (@happiescrappie) too! 


And don't forget to hop back to Citrus Twist Kits blog. Happy blog hopping!

sam-sig

Saturday, August 3, 2013

Tips & Tricks ⎪Gelatos® & Mini Book

Hello all, happy weekend! This is Sam here to share a few of my projects using Gelatos®  Some of you might wonder what is Gelatos®. Gelatos® are compact acid-free pigment sticks glide on creamy smooth for vibrant color and coverage.  All Gelatos® blend easily with or without water.  You could use this unique medium on paper, canvas, or wood!


770162 770163
The Gelatos® Tropical & 50's Diner set are currently available at Citrus Twist Kits Store. Add them to your cart and it will be shipped free together with your kits.

Here are some of the projects that I have used Gelatos® for the background.

First project is part of my wall art using embroidery hoop. The polka dots background is painted using Gelatos®. Just draw circle on the watercolor paper and blend it with water. 


Galatos - HoopsP7310682

The second project is a layout using Gelatos® and emboss-resist to create a rainbow background. I stamped and heat embossed the background with white embossing powder, then doodle different shade of colors - yellow, orange, blue, teal, purple and pink on the card stock. Take your time to blend the different colors with water. Note: all the products used here are from July kits excepts those random embellishment (Crate Paper) are RAK from one of my scrapbooking friends. 

You Are My WorldP7310693

Close-up of the Gelatos®  background: 


You Are My WorldP7310694

And here's the third projects using Gelatos® and October Afternoon Travel Girl stamp set. I went for a bookbinding crop a few days ago and made this mini notebook! Believe it or not, I was babywearing my boy for almost 3 hours while I bind one of these mini books. This book is made using August kit and watercolor papers & twines from my own stash. I also made a muslin bag to keep the mini book and memorabilia while I travel.

TravelogueP8030024

I keep the cover fairly flat and simple as I would want to keep them in my bag while I travel. 


Close-up of the stamped image on the muslin bag and the mini bookmarks (made using shrink plastic). 

TravelogueP8030026

These are the tools and supplies I used for stamping different medium in this project. 
Note:
  • VersaCraft is for stamping on fabric (the muslin bag)
  • Staz On (black) for stamping on shrink plastic and Opaque (cotton blue & white) for stamping on transparencies
  • VersaMark, embossing powder (white & gold) & heat gun are for heat embossing the image
  • VersaColor are used for stamping on the wood veneer
  • Stamp set of your choice (I used October Afternoon Travel Girl here)
  • Fiskars Stamp Press (great for stamping on transparencies)

TravelogueP8030013

These are the embellishments that I have stamped. 

TravelogueP8030015

Even with Fiskars Stamp press, I had to attempt a few times to stamp nicely on transparency.

TravelogueP8030002

Some of the pages of my mini book: I will fill this up when I go for my Jakarta trip in October.

TravelogueP8030040

Paint stripes and dots background using Gelatos®  

TravelogueP8030045

TravelogueP8030044

TravelogueP8030051

TravelogueP8030057

TravelogueP8030053

Do you know you can make your own mist using Gelatos®? I chopped off a small piece of Gelatos® and added a little water to create a paste. Then I added the paste along with some water in a Mini Mister to create my Gelatos®  mist! 

TravelogueP8030050

I used Tim Holtz Distress Stains to create the big paint splatter on the background. 

TravelogueP8030061

Thanks for reading such a long post. I hope this post would inspire you get your hands dirty and play with Gelatos® & stamps this weekend. Have a great weekend ahead!

sam-sig