Showing posts with label kikki k planner. Show all posts

Thursday, September 3, 2015

Planner Setup using August Happie Scrappie Planner Kit

Hello everyone, it’s Lucy (@organisedlucy) again on the blog. I cannot wait to share with everyone how I used the goodies from the August Happie Scrappie Planner kit to set up my planner. 

The August Happie Scrappie Planner Kit is my absolute favorite among all the Happie Scrappie Planner Kits that I received previously, as I always have interest in the beauty department even before I started my obsession over papers and stationeries. The August planner kit is definitely jam-packed with so many gorgeous goodies that you can easily personalize and use on your planners. Furthermore, this month’s planner kit is a collaboration between Sam and Sarah Zorel (@sarazorel).

Recently I succumbed myself to the temptation of buying the new Kikki K planner- Icy Blue Perforated Medium Size Planner. It is just too gorgeous. I am sure everyone has seen this planner on instagram, youtube, blogs and Kikki K Website. So when I received my Happie Scrappie Planner kit, I knew right away that I wanted to do a planner setup with Happie Scrappie goodies.


The August Happie Scrappie Planner kit comes with a double sided dashboard, a double sided page marker, twelve pieces of double sided journaling cards, four different designs of planner inserts, a roll of washi tape, one sheet of makeup theme deco stickers, transparent page flags, a pack of sticky notes, a pen, a charm and two Kate Spade paper clips. 


Let’s take a look at the Dashboard. It was printed double sided with two different designs on it. Since I love both designs of the dashboard, I decided to use a Post-It Index Tabs to act as a base to hold the dashboard and the pagemarker and punched holes on the tabs instead of punching holes directly on the dashboard. This is to ensure I will still be able to use the other side of the dashboard. The Index Tabs can be found in most stationery stores. You can apply the same method for the page marker too, as it was printed double sided with two different designs.


I then picked up one of the planner inserts and placed them on top of the dashboard with index tabs adhered on it. The purpose of this was just to ensure the spacing of the holes punched would fit perfectly into the planner's rings. I used the single hole puncher that I got from Kikki K recently. Although the size is rather small, it is in fact very sturdy and I managed to punch holes through the laminated dashboard. 


Next I like to put page flags and sticky notes in my planner pocket, as these stationeries are very functional to me. I normally use them to mark my calendar and my weekly layout. 


Then I moved on to select the journaling cards that I want to put in the planner. I was having a hard time during the selection process. The watercolor painted by Sam really complemented the illustration drawn by Sarah so much that I just could not take my eyes off the journaling cards. They are just too captivating! At the end I decided to pick the one with the banner on it that has the words “BE YOU TIFUL”. Instead of the usual display of the journaling card in a planner, I decided to add a cut out image from one of the journaling cards and clipped it to the other journaling card. 


Of course this setup would not be complete without a collection of washi tapes. They come in handy when I need to stick a notepad on the inserts or just for decorative purposes. I picked up an old business card and used it as the washi tapes holder. 


I also added my favorite stickers from Happie Scrappie such as the small dots, the happy mails & the fox critters stickers and the makeup stickers from June, July and August planner kits respectively into the largest pocket in the planner.


Since I purchased extra sets of the journaling cards (I may need more now), I decided to create DIY paper clips using some of the images from the journaling cards. 

Things that you will need to create the DIY paper clips are a piece of cardstock, paper clips, journaling cards, a pair of scissors, beacon glue, a laminator and a laminating pouch.


I started with cutting the images that I wanted from the journaling cards. Then I made a copy of the similar shape on the cardstock and cut them (this is to make sure I have sturdy paperclips). Next, I put them into the laminating sheet and ran it through the laminator. Finally I cut the laminated images and glued them to the paper clips using the beacon glue.

The processes are quite simple. You can find a youtube video by Lisa Pullano on how to do a DIY paperclips or you can find the tutorial on Sam's blog - link below.

http://happie-scrappie.blogspot.sg/2015/04/planners-from-scrapbooking-goodies-to.html


Lastly I added the Happie Scrappie Notepad to the back of the planner.
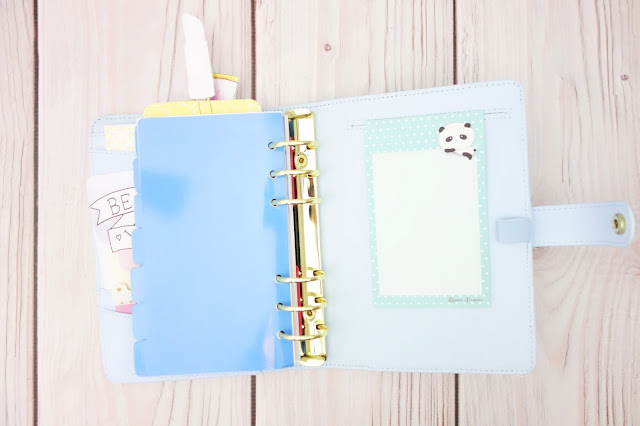


That’s about it! Now I have a newly setup planner with Happie Scrappie Goodies in it.


I hope you got an useful tip or two from this entry on how to use the Happie Scrappie Goodies.
See you next time.
Happie Planning everyone! 

FYI Happie Scrappie has its own Facebook Group now, do join the fun - link below :)
https://www.facebook.com/groups/439566509577989/

XOXO

Lucy


Tiny Dots Stickers


Monday, May 18, 2015

Planners | From Project Life Pockets to Planner Storage

Hello hello there! Today I am gonna share a simple post on how I use the pocket sleeves from Simple Stories in one of my A5 sized planner to store my Shop Evalicious goodies (like stickers, journaling cards and paper clips).


Sorry for the glare but this is the best photo i could get to show you a rough idea how the plastic sleeve (in 6x8 size) would look like in a Kikki K Large planner. In general, Kikki K large planner (which is equivalent to Filofax A5 size) is slightly wider, thus I did not trim down the sides of the sleeves as they just fit nicely.


And now, let's get started to turn this Project Life sleeves into planner pockets. All you need is a single hole punch and 6x8 plastic sleeve ( mine are from Simple Stories and i love love love their quality)


I just use one of the A5 size insert to determine where the holes should go. The original 2 holes on the sleeves actually match up with the 2nd and 5th holes of my 6-ring binder.


And here's how the sleeves look like in my A5 sized planner. Nothing is peeking out but when you close the binder, the sleeve might touch the elastic pen loop a little bit but it doesn't bother me at all as I don't really keep my pen there.


For this page, I actually fill up all the pockets with planner stickers. I actually use a paperclip from Shop Evalicious to hold the pocket to prevent the stickers from falling out of the pocket. I usually make my stickers in 3.75' x 5.75', so they are just perfect to be slotted into the 4x6 sized pocket.

p.s the hot air balloon and dew drop stickers can be found in my shop.


I added some journaling cards and Instax photo to the back of this pocket.


And for the sleeve, I actually store some washi tapes sampler and also paper clips. I just trim the 3x4 journalling card a little smaller than 3' and wrap washi tapes around. And for storing paper clips, I cut two slits with my trusty paper trimmer, and added the clips.


And more pics on how each sleeve looks like. This pockets are also perfect for storing memorabilia, receipts and name cards. I hope you have fun using some of your scrapbooking stash in your planners!

Have a great day ;)


Xoxo,
Sam


Evalicious products used:
    

Saturday, December 27, 2014

Planner | How To Make Page Marker for Your Planner

Hello all! Happy holidays and happy weekend =) Today I am showing you some of the page markers that I made for my planners. Most of my planners have their own set of dividers and page markers. I don't use them all at once but I would like to swap the dividers and page markers depends of my mood and season. Most of these page markers are either made of scrapbook pages, stamp image or I draw the image myself.


Some of you may ask, what is page marker? For most of the 6-rings binder users (be it Filofax, Kikki K, Kate Spade agenda etc) they always come with a ruler-like book mark. This is to serve as bookmarking purpose, to let you quickly flip to the page when you are using for that day/that week. The planners normally come with a transparent piece of plastic ruler with 6 hole-punched. But so personalized our own planner, a lot of planner nerds like to customized their dividers and page marker with a theme. See how the ice cream & TODAY page marker is longer than the usual pages and make looking for particular page so much easier?


Making your own customized page marker is easy and fun, and it wouldn't take you more than 15 minutes to make one. It is as simple as making cards, just that you would need to send it to a hot laminator to laminate it & make it sturdier.


To make your own page marker / dividers, you will need the following:
1. Original dividers from your planner / Daisy Day Planner monthly divider to use as guide for sizing and holes
2. a piece of scrapbook paper or cardstock of your choice (I painted a piece of white cardstock with Distress Paint and trim it down)
3. Jubilee sticky notes that come with your December Cocoa Day Planner kit (Optional)
4. Die Cut/ Stickers / Letter Stickers to decorate your page marker (make sure they are relatively thin / flat, not puffy stickers or foam stickers else you will not be able to laminate it)
5. Scissors & Hole Punch (I am just using a single hole punch that you can get it from any office supply store)
6. Hot Laminator (If you do not have laminator machine, you can send it to office supplies store to get them laminate for your or you learn how to laminate with an iron by watching this video.


Firstly, I am using my A5 sized Daisy Day Planner December divider as a guide for the size of the page marker. I eyeballed the width of the pagemarker marker to be around 3 inches and the height to be approximately an inch taller than the December divider so It will peek out from the top tab when it is done.


Then I added the Sticky memo with calendar and Today from the December kit + HELLO tab using stickers from one of older Amy Tangerine collection. I added more adhesive to the back of the sticky notes so that they won't move when I send the page marker for lamination. I also stamp some sentiments using the cute stamps that come with December kit. the coffee cup is just too too cute! I decided to make one more matching page marker in Personal sized since I have left over paper.


I then punch 6 holes by using the December divider as guide and also added reinforcement rings to make it look cuter. I actually color the white reinforcement rings with copic markers and now they have rainbow colors. I also like to round the corner of my page marker else the edges might be too sharp after it being laminated.


And this is how my page markers look like once I laminated them. I re-punched the 6 holes again and cut little slits next to the punched holes. This would make slotting in and out of the page marker much easier, without opening the rings. Okay, now move on to how to make your page marker more than a book mark? You can use it as a to-do list / reminder than it will pop up whenever you open your planner. Since I have calendar and to-do list on the page marker, then you would ask, what are the pens to use / write on laminated plastic?

You have 2 options here:
1. Use dry erase / whiteboard markers
2. Use Permanent markers


Now let's look at Option 1: Dry Erase / white board markers that I learn this tips from Donna (Instagram: @umbooba). I got these markers from Daiso and they work perfectly. The black one even comes with a felt roller that serve as the eraser to erase the markers from the plastic / whiteboard. However....


I do not like how thick the marker pens nib are. And I also do not like how easily the writing being rubbed off when I was using the page marker and the writings sometimes transfer to the page next to it.


But the invention of the felt roller cap is just brilliant. I don't use these dry erase markers on my page markers but I do use them to draw on a whiteboard notebook (from Daiso) to keep my 20 month old entertained when we are out and about. Love that the colorful markers are of finer nibs.


And now let's move on to Option 2: Permananet Markers (like sharpie, American Crafts Slick Writer, Pilot Twin Marker & Pilot Multiball) + Erasing tools: Alcohol swab & Eraser (I kid you not!) I will post a link where you can get those pens later.


Here's the pen swatch that I write with the above for permanent markers. I like love those with Ultra fine nib as I have small hand writings.
1. Pilot Multiball in Fine and Medium nib. These are my favourite as they write with gel-pen like tip (not felt tip like the usual markers) and the nib is really really fine too. Plus sometimes I forgot to switch my pen to write on normal planner pages, these pens don't bleed through the pages! Which is super awesome as I can use them to write on any surface! You can get them here in different nib and colors. You can check on the link for photos that show you they don't bleed thru the pages.
2. Sharpie. I like the double ended Sharpie as they comes in ultra fine nib and a lot of colors! They are so inexpensive and easily accessible in any book stores / stationery shops. Get them here.
3. Pilot Twin Marker. Or some call them as the Washi Pens/ Markers. I love using them on the laminated plastics, writing on mailer bags or washi tapes for labeling. There are inexpensive and last a long time. You can get them here.
4. American Slick Writer. These pens are waterproof, fade proof, acid-free and comes in so many colors! I found a link on Amazon where you can different colors here. I love that the Amy Tangerine Yes, Please collection slick writer comes with fun & vibrant colors!

Then now the question is, since they are permanent markers, how do you clean them off the page markers?


And the answer is.... good ol' earsers! I actually learn this trick from a girl on Instagram (IG name: @jenkneelinderz). The not-so-stubborn / felt tip markers can be erased with eraser effortlessly, well almost effortlessly. And the Pilot Multiball writings can be erased with eraser too, but you need to use a little more effort & strength *LoL*


The next method is to use alcohol swab to remove everything and wipe the surface clean again with paper towel / tissue paper. The Pilot Multiball inks can be removed with alcohol swap effortlessly.


And what I normally do is: I clean the writings with alcohol swabs first and clean any traces with eraser! And now I have a brand new page marker as my to-do list. So now, you might ask, which pens/ markers is my favourite for writing on plastic dividers?

Another tips I have learnt when I was young - when we accidentally write on the whiteboard using permanent markers - we use dry-earse markers / whiteboard markers to write over it and erase them again. This is so simple but it might leave some grey tint ink on the plastic dividers. So I wont recommend using this method unless you are out an about without alcohol swab or eraser.


I would love to use the Pilot Twin Markers (Ultra Fine nib) to write my to do list as it can be erased easily with eraser. And the dates on calendar or something that I plan to keep the writing a little longer (do not have to be erased daily), I would use Pilot Multiball.


I seriously hope you enjoy reading my tips & tricks in this post + try your hands on making your own dividers / page markers. It is so fun to customize / personalize your own planner(s) according to your need and preference. And my next post is about pen test on Cocoa Daisy Day Planner pages / paper! Do leave a comment down below what is your beloved pens / pens that you would like me to test out, and I will try to find them in my book store. It is so fun to experiment with new stationeries!

XoXo,
Sam