Showing posts with label planner addict. Show all posts

Thursday, September 3, 2015

Planner Setup using August Happie Scrappie Planner Kit

Hello everyone, it’s Lucy (@organisedlucy) again on the blog. I cannot wait to share with everyone how I used the goodies from the August Happie Scrappie Planner kit to set up my planner. 

The August Happie Scrappie Planner Kit is my absolute favorite among all the Happie Scrappie Planner Kits that I received previously, as I always have interest in the beauty department even before I started my obsession over papers and stationeries. The August planner kit is definitely jam-packed with so many gorgeous goodies that you can easily personalize and use on your planners. Furthermore, this month’s planner kit is a collaboration between Sam and Sarah Zorel (@sarazorel).

Recently I succumbed myself to the temptation of buying the new Kikki K planner- Icy Blue Perforated Medium Size Planner. It is just too gorgeous. I am sure everyone has seen this planner on instagram, youtube, blogs and Kikki K Website. So when I received my Happie Scrappie Planner kit, I knew right away that I wanted to do a planner setup with Happie Scrappie goodies.


The August Happie Scrappie Planner kit comes with a double sided dashboard, a double sided page marker, twelve pieces of double sided journaling cards, four different designs of planner inserts, a roll of washi tape, one sheet of makeup theme deco stickers, transparent page flags, a pack of sticky notes, a pen, a charm and two Kate Spade paper clips. 


Let’s take a look at the Dashboard. It was printed double sided with two different designs on it. Since I love both designs of the dashboard, I decided to use a Post-It Index Tabs to act as a base to hold the dashboard and the pagemarker and punched holes on the tabs instead of punching holes directly on the dashboard. This is to ensure I will still be able to use the other side of the dashboard. The Index Tabs can be found in most stationery stores. You can apply the same method for the page marker too, as it was printed double sided with two different designs.


I then picked up one of the planner inserts and placed them on top of the dashboard with index tabs adhered on it. The purpose of this was just to ensure the spacing of the holes punched would fit perfectly into the planner's rings. I used the single hole puncher that I got from Kikki K recently. Although the size is rather small, it is in fact very sturdy and I managed to punch holes through the laminated dashboard. 


Next I like to put page flags and sticky notes in my planner pocket, as these stationeries are very functional to me. I normally use them to mark my calendar and my weekly layout. 


Then I moved on to select the journaling cards that I want to put in the planner. I was having a hard time during the selection process. The watercolor painted by Sam really complemented the illustration drawn by Sarah so much that I just could not take my eyes off the journaling cards. They are just too captivating! At the end I decided to pick the one with the banner on it that has the words “BE YOU TIFUL”. Instead of the usual display of the journaling card in a planner, I decided to add a cut out image from one of the journaling cards and clipped it to the other journaling card. 


Of course this setup would not be complete without a collection of washi tapes. They come in handy when I need to stick a notepad on the inserts or just for decorative purposes. I picked up an old business card and used it as the washi tapes holder. 


I also added my favorite stickers from Happie Scrappie such as the small dots, the happy mails & the fox critters stickers and the makeup stickers from June, July and August planner kits respectively into the largest pocket in the planner.


Since I purchased extra sets of the journaling cards (I may need more now), I decided to create DIY paper clips using some of the images from the journaling cards. 

Things that you will need to create the DIY paper clips are a piece of cardstock, paper clips, journaling cards, a pair of scissors, beacon glue, a laminator and a laminating pouch.


I started with cutting the images that I wanted from the journaling cards. Then I made a copy of the similar shape on the cardstock and cut them (this is to make sure I have sturdy paperclips). Next, I put them into the laminating sheet and ran it through the laminator. Finally I cut the laminated images and glued them to the paper clips using the beacon glue.

The processes are quite simple. You can find a youtube video by Lisa Pullano on how to do a DIY paperclips or you can find the tutorial on Sam's blog - link below.

http://happie-scrappie.blogspot.sg/2015/04/planners-from-scrapbooking-goodies-to.html


Lastly I added the Happie Scrappie Notepad to the back of the planner.
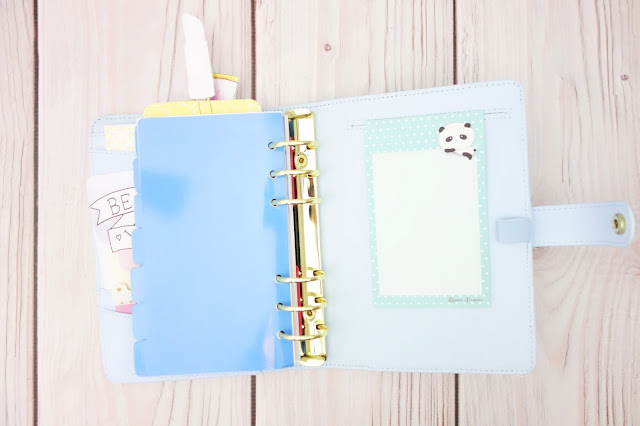


That’s about it! Now I have a newly setup planner with Happie Scrappie Goodies in it.


I hope you got an useful tip or two from this entry on how to use the Happie Scrappie Goodies.
See you next time.
Happie Planning everyone! 

FYI Happie Scrappie has its own Facebook Group now, do join the fun - link below :)
https://www.facebook.com/groups/439566509577989/

XOXO

Lucy


Tiny Dots Stickers


Friday, July 31, 2015

Planning Fun With The Happie Scrappie Kit


Hello Everyone! My name is Linda aka Emeraldz4 from IG. I'm so happy to be able to share with you all my wonderful experience with the Happie Scrappie planner kit!  First and foremost, I absolutely love everything in this kit! My eyes literally lit up as I opened the package. It was a lovely sight for sure! I love every single thing in this kit, but my favorites would have to be the panda stickers and the journaling cards! They are so cute and I love the bright, happy colors!  


There are so many ways to decorate your planners with this planner kit. I used the kit to decorate my two main planners at the moment, my Kikki K lilac planner and my Happy Planner. For my Kikki K planner, I laminated one of the panda inserts so that I can write and erase notes easily using dry erase markers. I liked this for writing down quick reminders for dentist appointments, water bill due dates and pet food. I also like to use the laminated inserts as a dashboard for my sticky notes. 


For one of the pages in my Kikki k planner, I used the cute panda stickers for my weekly "to do" and "to buy." It is a cute way of labeling my checklists. It is a cute way of labeling my checklists. The washi tape and stickers included in this kit are great for adding pops of color to the blank pages of my Kikki K planner as well as my Happy Planner


As you can tell, the decorating possibilities are endless with this kit! For those who are just getting into planning, these themed kits makes planning super fun and easy! It definitely makes planning fun for me and I am 100% sure it will be for you all as well! I can't wait to get my hands on the new kit! Makeup theme kit? Sign me up please!


Things that I used in this post


Monday, July 13, 2015

Love from Spain


Buenos días a to@s!
Soy María, soy española, y vivo en Madrid, si me seguís por instagram (@mariacgbc), ya sabréis que adoro las cosas bonitas y en especial las que crea Sam, además de los sellos claro!
Estoy encantada de poder compartir un poquito de mi proceso creativo, por si os sirve de inspiración, o si os da alguna idea para vuestras agendas, o lo que sea!

En estos momentos estoy usando varias agendas, de distintos tamaños, pero para cosas distintas también! 

Good morning to all!
Here Maria, I am Spanish, and I live in Madrid, if you follow me on instagram (@mariacgbc), you will know that I love beautiful things and especially Sam’s creations, along with the stamps!
I am delighted to share a bit of my creative processes, to inspire you, or to give you ideas for your planners.

Right now I am using various planners, in different sizes, but for different purposes too!


En España no es muy común tener tantas, y eso que yo tengo muy pocas comparado con lo que he visto por la red!
A diario uso una agenda (personal size) por la comodidad de llevarla encima, el tamaño me parece perfecto! Además de las tareas que tengo que hacer, la uso como recordatorio de qué he hecho, para luego hacer mi project life, que no llevo muy al día… me pasa sólo a mi?
Para tener en mi escritorio, uso una agenda A5, y para dibujar, hacer un poco de mix media y experimentar uso mi happiedori, que por cierto, adoro!

Antes de hacer nada, veo con qué cosas voy a “jugar” ese día

In Spain it is not very common to have many planner supplies, and I have very little of those compared to what we have seen over the internet!
For daily usage, I picked a personal size planner due to the size which makes it convenience to bring it everywhere! In addition to the tasks I have to do (that I write in my planner), I use it as a reminder of what I have done (journaling), and then do my project life, but I do not keep myself up to date with it ... It just happen to me I guess?

For on the desk planner, I use an A5 planner. And for drawing, creating some mix media, and testing purposes, I use my happiedori, which BTW, I love it so much!

Before doing anything, usually I will look at my planners supplies that I will "play with" for that day.


Esta semana he decidido estampar estas banderolas para marcar los días (en los colores del arcoíris, por supuesto!) he apuntado las cosas que tengo que hacer esta semana (en casa y en el trabajo) y he usado pegatinas para decorar, todavía pondré más, hasta que acabe la semana….

This week I decided to stamp these banners stamps to mark the days (in the colors of the rainbow, of course!) I have listed the things that I have to do this week (at home and at work) and I used stickers to decorate the inserts. I added more stickers until the end of the week ....


(He decidido usar una de las hojas del kit de mayo, tema globos aerostáticos)

(I decided to use A5 inserts from May planner kit "hot air balloons theme")

Y en la parte derecha de la agenda puedo apuntar cosas que tengo que hacer, marcadas con pegatinas que vienen en el kit, pero no hay un día concreto para hacerlas, (sólo tengo que no olvidarme!) (esta idea es de mi compañera Wan @wansplansandexplorations) y otras pegatinas para decorar, porque me gusta! También he añadido la lista de la compra, así, el día que vaya, sólo tengo que despegarla y no olvidaré nada necesario!

And on the right side of the planner, I listed down things that I have to do, labeled them with the stickers that come in the kit, but no specific day for them, (this is to ensure I do not forget about the lists) (This idea is inspired by Wan @wansplansandexplorations) and I put more stickers to decorate, because I love them! I also added the shopping list, so when I need to go shopping, all I have to do is just peel it off. This is just making sure that I will not miss anything.


Como veis, también me gusta decorar con sellos y dibujos, y para eso las hojas de Sam son PERFECTAS! Os gusta estampar? A mi me encanta! Pero por desgracia, las agendas que he tenido hasta ahora no me permitían hacerlo tanto como quiero porque se ve el estampado por el otro lado…. Ahora soy libre de hacerlo tantas veces como quiera, oh yeah!

As you can see, I also like to decorate with stamps and drawings, and Sam’s papers are PERFECT! Do you like stamping? I love it! Unfortunately, the planners that I have had so far prevented me from doing as much as I wanted to do as the back of the stamped pages always showed little shadowing .... Now I'm free to do it any way I want, oh yeah!


Para la agenda que llevo encima, siempre decoro antes de empezar a usarla, creo que es porque si no lo veo bonito, no me apetece ni abrirla.

For the planner that I always carry with me, I decorated it before I start using it, I think it is because if I see it's not pretty, I do not feel like using it. 


(semana decorada)

(decorated week layout)


(todas las semanas meto alguna tarjeta, o nota (del block de notas que viene en el kit) para animarme durante la semana

(every week I put a card or a notepad (the notepad that comes in the kit) to add more fun during the week

Y por último, mi adorado happiedori (Sam, quiero más)

And finally, my beloved happiedori (Sam, I want more!)


También lo llevo encima muy a menudo, para tomar notas de ideas (siempre pensando en cosas que hacer, probar o ideas en general, frases que  me gustan….) y es realmente perfecto y cómodo. Llevo varios inserts, cada uno de ellos con diferentes cosas.

I carry it very often, to take notes, to brainstorm ideas (always thinking of things to do, try, or ideas in general, phrases that I like ....) And it is really perfect and comfortable. I took several inserts, each filled with different things.


Uno para ideas en general, o cosas que tengo que consultar más adelante.
Otro para dibujar, estampar, poner washi….

One Insert for general ideas or things I need to check later.
The second insert is for drawing, stamping, washi tapes samples storage ....


Otro para tener una visión general de la semana.
Y otro que uso principalmente para hacer pruebas de mix media, acuarelas y sellos sobre todo!

The third insert is for an overview of the week.
And the last insert is mainly for mix media testing, particularly watercolors and stamps!


Habéis visto el “charm” de polo? (popsicle) está hecho copiando el dibujo del separador/dashboard de Sam, y luego he usado shrink plastic.

Have you seen the popsicle charm? It is made from shrink plastic. I was inspired by Sam's Page Marker design from June Planner kit. 

Bueno, y hasta aquí por hoy, espero que os haya gustado o al menos haber cogido alguna idea interesante, nos vemos pronto con más inspiración!

Well, today is up to here, I hope you like it or at least you are inspired with some interesting idea, see you soon with more inspiration!

Besos y abrazos!

XOXO
Washi Tape